By Darrell Staight
Saturday August 15 – FREE Light Monkey Reeling Workshop @ Diving Adelaide starting at 12pm!
Swing by Diving Adelaide this Saturday for a workshop on how to use a reel (and/or spool) and practice different wraps and tie offs with reeling expert Darrell! Light Monkey has sent down a whole range of reels and spools for you to have a play with! The workshop will take about 2 hours.
Anatomy of Diving Reels and Guideline
Introduction
Recently, when speaking to a non-diving family member on the subject of reel and guideline use whilst diving I was met with the somewhat sarcastic reply, “So you are basically talking about swimming around with a ball of string?” Whilst this tongue in cheek, throw away comment may not in any way adequately explain the importance of good reel and guideline skills, it did occur to me that this in fact wasn’t very far removed from how the development of using reels and guideline in wreck and cave diving started. On just about every wreck and cave diving course around the world now it’s likely that your instructor will continually stress the importance of using these tools until it becomes second nature. But only a few decades ago, this wasn’t the case as the development of technical diving courses was in it’s infancy. Divers instead were making it up as they went along by trial and error, innovating using such things as drums of plastic cable, heavy buoyant line or other such totally inadequate things. Like many other innovations things tend to go through a process of evolution with many innovations going through a kind of ‘natural selection’ that exists in adventure sports with only the best ideas, equipment and (unfortunately in many cases) divers surviving.
The Difference Between Reels and Spools
There are many different types of reels available on the market with most manufacturers who make technical diving equipment producing them and in a few different sizes. To broadly separate them out however let’s distinguish first between those that have a spool of guideline, frame, handle, a knob for winding in and a locking screw (or nut) – known collectively as reels, and those that are just a spool of guideline by themself.
Most divers will have uses for both reels and spools as they progress through their training (both in and out of overhead environments) but I’m going to focus on the basic use of the reel here.
The material from which the reel is made is varied and plastic is not uncommon, however there is a special thermoplastic used in engineering called ‘delrin’ which has become a popular choice due to it’s high stiffness, lower friction and general resistance to damage. As stated above, a reel will have a spool on which a length of guideline is attached round, this spool is in turn connected to an axle which connects to the reel frame. The frame will also have a handle, a guide through which the guideline goes and a locking screw to stop the spool from turning when desired. Connected to the spool is a knob which a diver uses to reel in the guideline, generally when exiting the wreck or cave. There also needs to be a clip to attach the reel to the divers BCD or harness.
Guideline
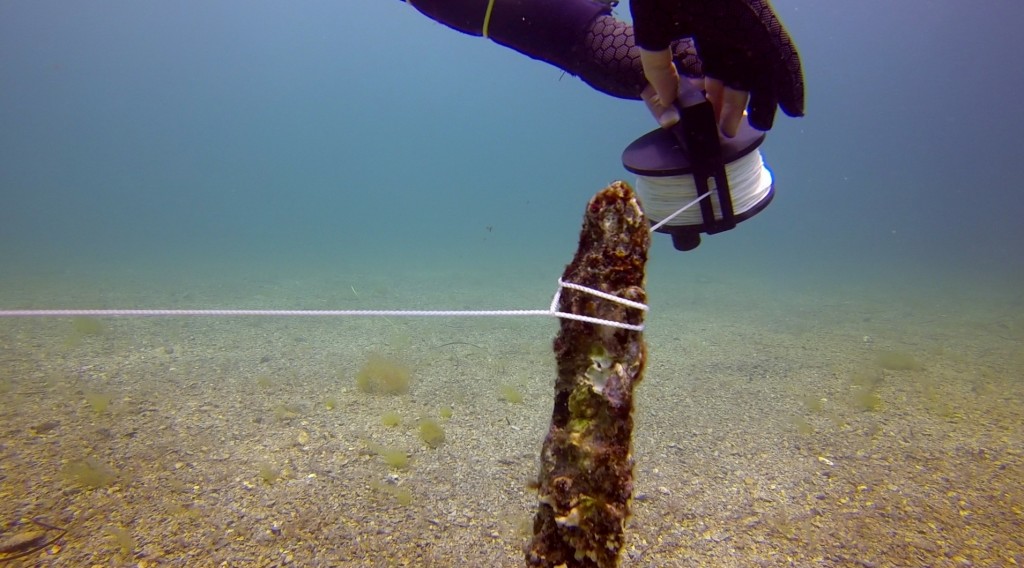
The guideline that goes on the reel is generally braided white nylon due to it’s tendency to be more visible, it’s negative buoyancy characteristics (a sinking line) and resilience to wear and tear. Most reels come with what is known as #24 line (or 24 gauge line) although thicker lines are sometimes preferred by some divers (particularly when fixing a more permanent line in a large cave system). Essentially the main purpose of guideline is a reference a diver can (preferably) see to find their way out of an overhead environment to safety, or if necessary in the event of catastrophic multiple light failures or silt out (albeit not preferable) feel to find their way out. In addition to preventing divers from getting lost, guideline can also be useful in measuring distance. For example, when mapping a wreck or a cave, a diver can tie small knots every 3 metres or so and record the distance between notable features (along with bearing and depth).
The guideline is wound around the spool, with one end attached to the axel and the other end with a loop large enough tied in it that you can comfortably fit the entire reel through. This ‘End Loop’ gets threaded through the line guide. Most reels normally come with some sort of small plastic ball that also gets threaded on this ‘End Loop’ thus preventing the guideline from being pulled all the way through the line guide. Some choose to remove this ball and instead attach the loop round the locking screw instead.
Reel Size
There are many different reel sizes available but extremely large ones are more cumbersome and are generally used more in exploration for fixing large quantities of guideline (as commonly done in large cave systems). More commonly a technical diver has smaller to mid-sized reels in their possession. Reels around 120 metres in length are common and serve numerous purposes. Smaller ones may also be adequate.
Enclosed Reels VS Open Reels
Like with so many things in diving some things just come down to personal subjective preference. Some favour a reel that has some sort of cover on the frame that completely encloses the spool, whereas others favour an entirely open reel. However most technical divers favour an open reel because in the event that a line becomes slack and inadvertently a loose loop comes off the spool (yes it does happen, even with an enclosed reel) then they can sometimes fix this underwater. This is not possible with an enclosed reel and one has to take it apart when out of the water to address the problem.
Securing the Reel to your BCD/Harness
There are two ways of attaching the reel to a D ring on your BCD or harness. The preferred way is using a double ended bolt snap clip. You remove the reel from your harness but then can remove the clip itself and clip that back on your harness. The other way is having a one ended bolt snap clip attached to the reel in a more permanent way and and unclipping the reel and clip in one go with them subsequently staying attached to each other. Most technical divers prefer to have a double ended clip that they can totally remove from the reel frame and place back on a D ring by itself. This way it is out of the way and is not able to snag the guideline as you are deploying or retrieving it. Whereabouts on your BCD or harness you connect the reel is totally a matter of personal preference. There are normally numerous D rings from which to choose but generally it needs to be somewhere you can easily reach and somewhere sufficiently out of the way that’s not going to easily entangle guideline (not hanging down in front of you). A popular place with many technical divers is the back of the crotch strap, but other D rings to the side rear can be acceptable too. Divers may need to attach an additional D ring if none are already in the desired location. Gate action clips (often referred to by the technical diving community as suicide clips) are NOT recommended due to their ability to trap guidelines easily by merely brushing against them.
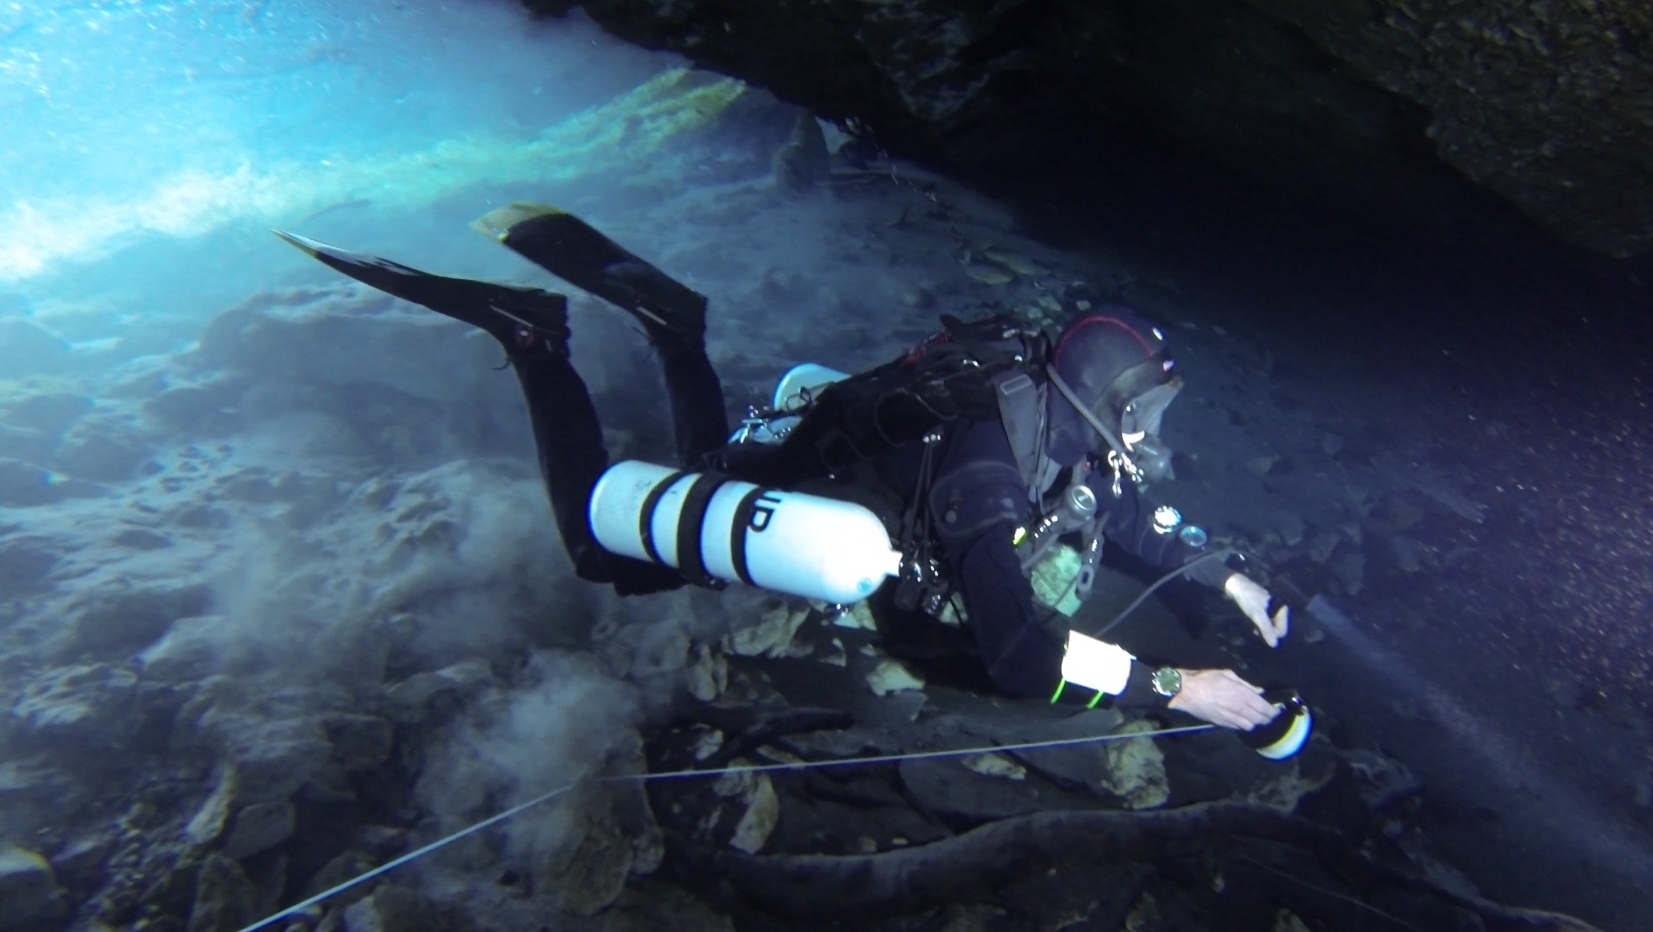
Laying the guideline
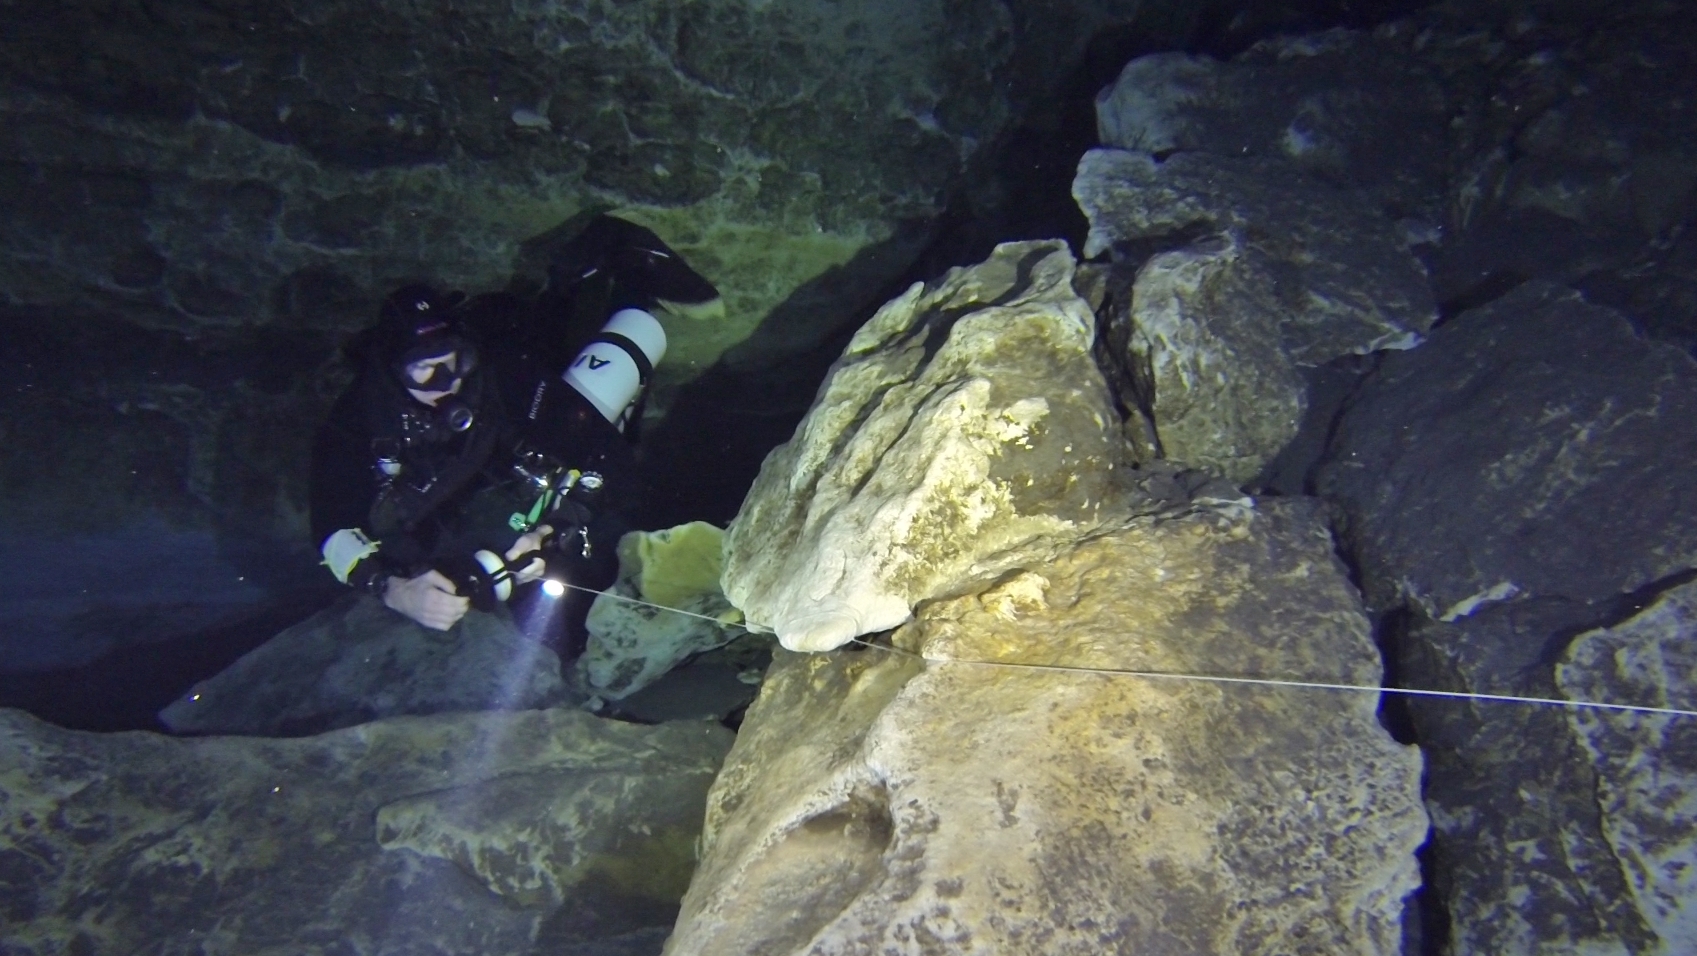
Before discussing how to attach guideline inside a wreck or cave (tie off’s) it’s probably worthwhile mentioning that although there’s no single definitive method of laying line, there are certainly a few ways not to do it. Many divers will develop their own tie off’s and the way that they handle a reel and there is no problem with this. As long as tie off’s go on easily, stay on without slipping and come off easily when desired then they are generally suitable. The laying of guideline should be done in a timely manner and the person reeling should be able to feel almost as comfortable doing this as if they were following as the second diver.
Generally guideline should be deployed so it is tight but not overly tight. Even guideline has a certain inherent flexibility in it and although it should present as a straight line between two fixed objects underwater, there is no necessity to tighten it beyond this. Guidelines that are too tight will more easily come off an object they are attached to or even break under strain. Conversely the line should not be too loose. Big drooping lines between tie off points are a clear indication that the guideline is too loose and this can present an entanglement hazard that can snag a divers equipment. In the event that such a line presents itself (perhaps the person reeling and fixing the line, has not done a tie off properly and it’s come off) the second diver can always address this by re-attaching it or further wrapping it around an object to take out the loose line. Generally the diver leading and handling the reel has the job of handling the reel itself, tying it off to features within the wreck or cave (be it by tie off’s, wraps or line placement) and the other following diver(s) may assist from further behind if something has not been done properly. The leader also needs to consider the features within the wreck or cave and ensure that a line placed around a feature is not likely to become dislodged into a tighter area above or below that is hard to remove it from and is too tight for a diver to pass through safely. Such a feature is often referred to as a line trap. It’s also preferable to attach a guideline near a deck or floor to allow the diver to more easily locate the line in front of them and reduce the chance of entanglement. This is particularly relevant if a diver were to accidentally come off the guideline in a low visibility situation (or multiple light failures) as otherwise re-locating the guideline by using a lost line search can be extremely difficult.
The diver immediately following the leader is in a good position to provide additional lighting to make it easier for them to see what they are doing. As for who reels and who follows (not forgetting that sometimes it’s more than two divers in a group) divers should be encouraged to swap duties on different dives so that everyone has opportunities to gain experience at this important skill. Often it is actually better to have the least experienced diver reeling as they can make a decision as to where you as a group go based on their comfort levels and experience (it is sometimes harder to communicate one’s reluctance to enter a compartment from the back of a group if the person reeling has already entered)! Lastly be familiar with communication methods both by using hand signals (for use when you have good visibility) and tactile signals (for use if you have extremely poor or zero visibility). It’s important for a buddy pair or team to not become too widely separated in case of emergency and for all members to know what the plan is, particularly when an unexpected incident arises.
The diver(s) following don’t necessarily have to have their hands on the guideline but should position themselves so that they are diving above it (never below it due to the risk of snagging tank valves and other parts of divers equipment that are not easy to reach and resolve). All divers should be close enough to make contact with the guideline should it be necessary (total silt out). In the event of a silt out then having your hand around the line in a loose cup formation is the preferred method as pulling hard on the guideline could either dislodge tie off’s or damage the line. As long as you are in a position to feel it and it is taught you should have a reference out of the wreck or cave to safety.
Wraps and Tie Offs
Wraps and tie offs are the main way that a guideline is attached to features within a wreck or cave (or even out in the open water). They offer a non-invasive, non-damaging way of connecting your guideline to features of the overhead environment itself, hence marking your way in and out without leaving a permanent trail of destruction in the process! Often you’ll hear a diver refer to the process as ‘tying off’ the line but they may be actually be referring to either using a wrap or a tie off (it is actually more common to use some form of wrap). Wraps generally involve taking the line (and sometimes reel itself) around a fixed object. Most technical divers like to end the wrap by locking it off against itself as this utilises friction to make it less likely for the guideline to slip. A tie off (in the proper sense of the word) is usually slightly different and involves using a bight of the guideline and tying this onto or around an object as if the bight was a single piece of line.
The following are by no means an exhaustive list. There are many others and different divers will have their own preferences. There are also some variations of these as well, some of the variations making the particular wrap or tie off more secure. There are also some different names for the following out there in the diving community so don’t be surprised if you hear divers call it by another name. But this is a reasonable starting point in your repertoire of Wraps and Tie off’s when learning the basics of reel and guideline use and it should serve you well.
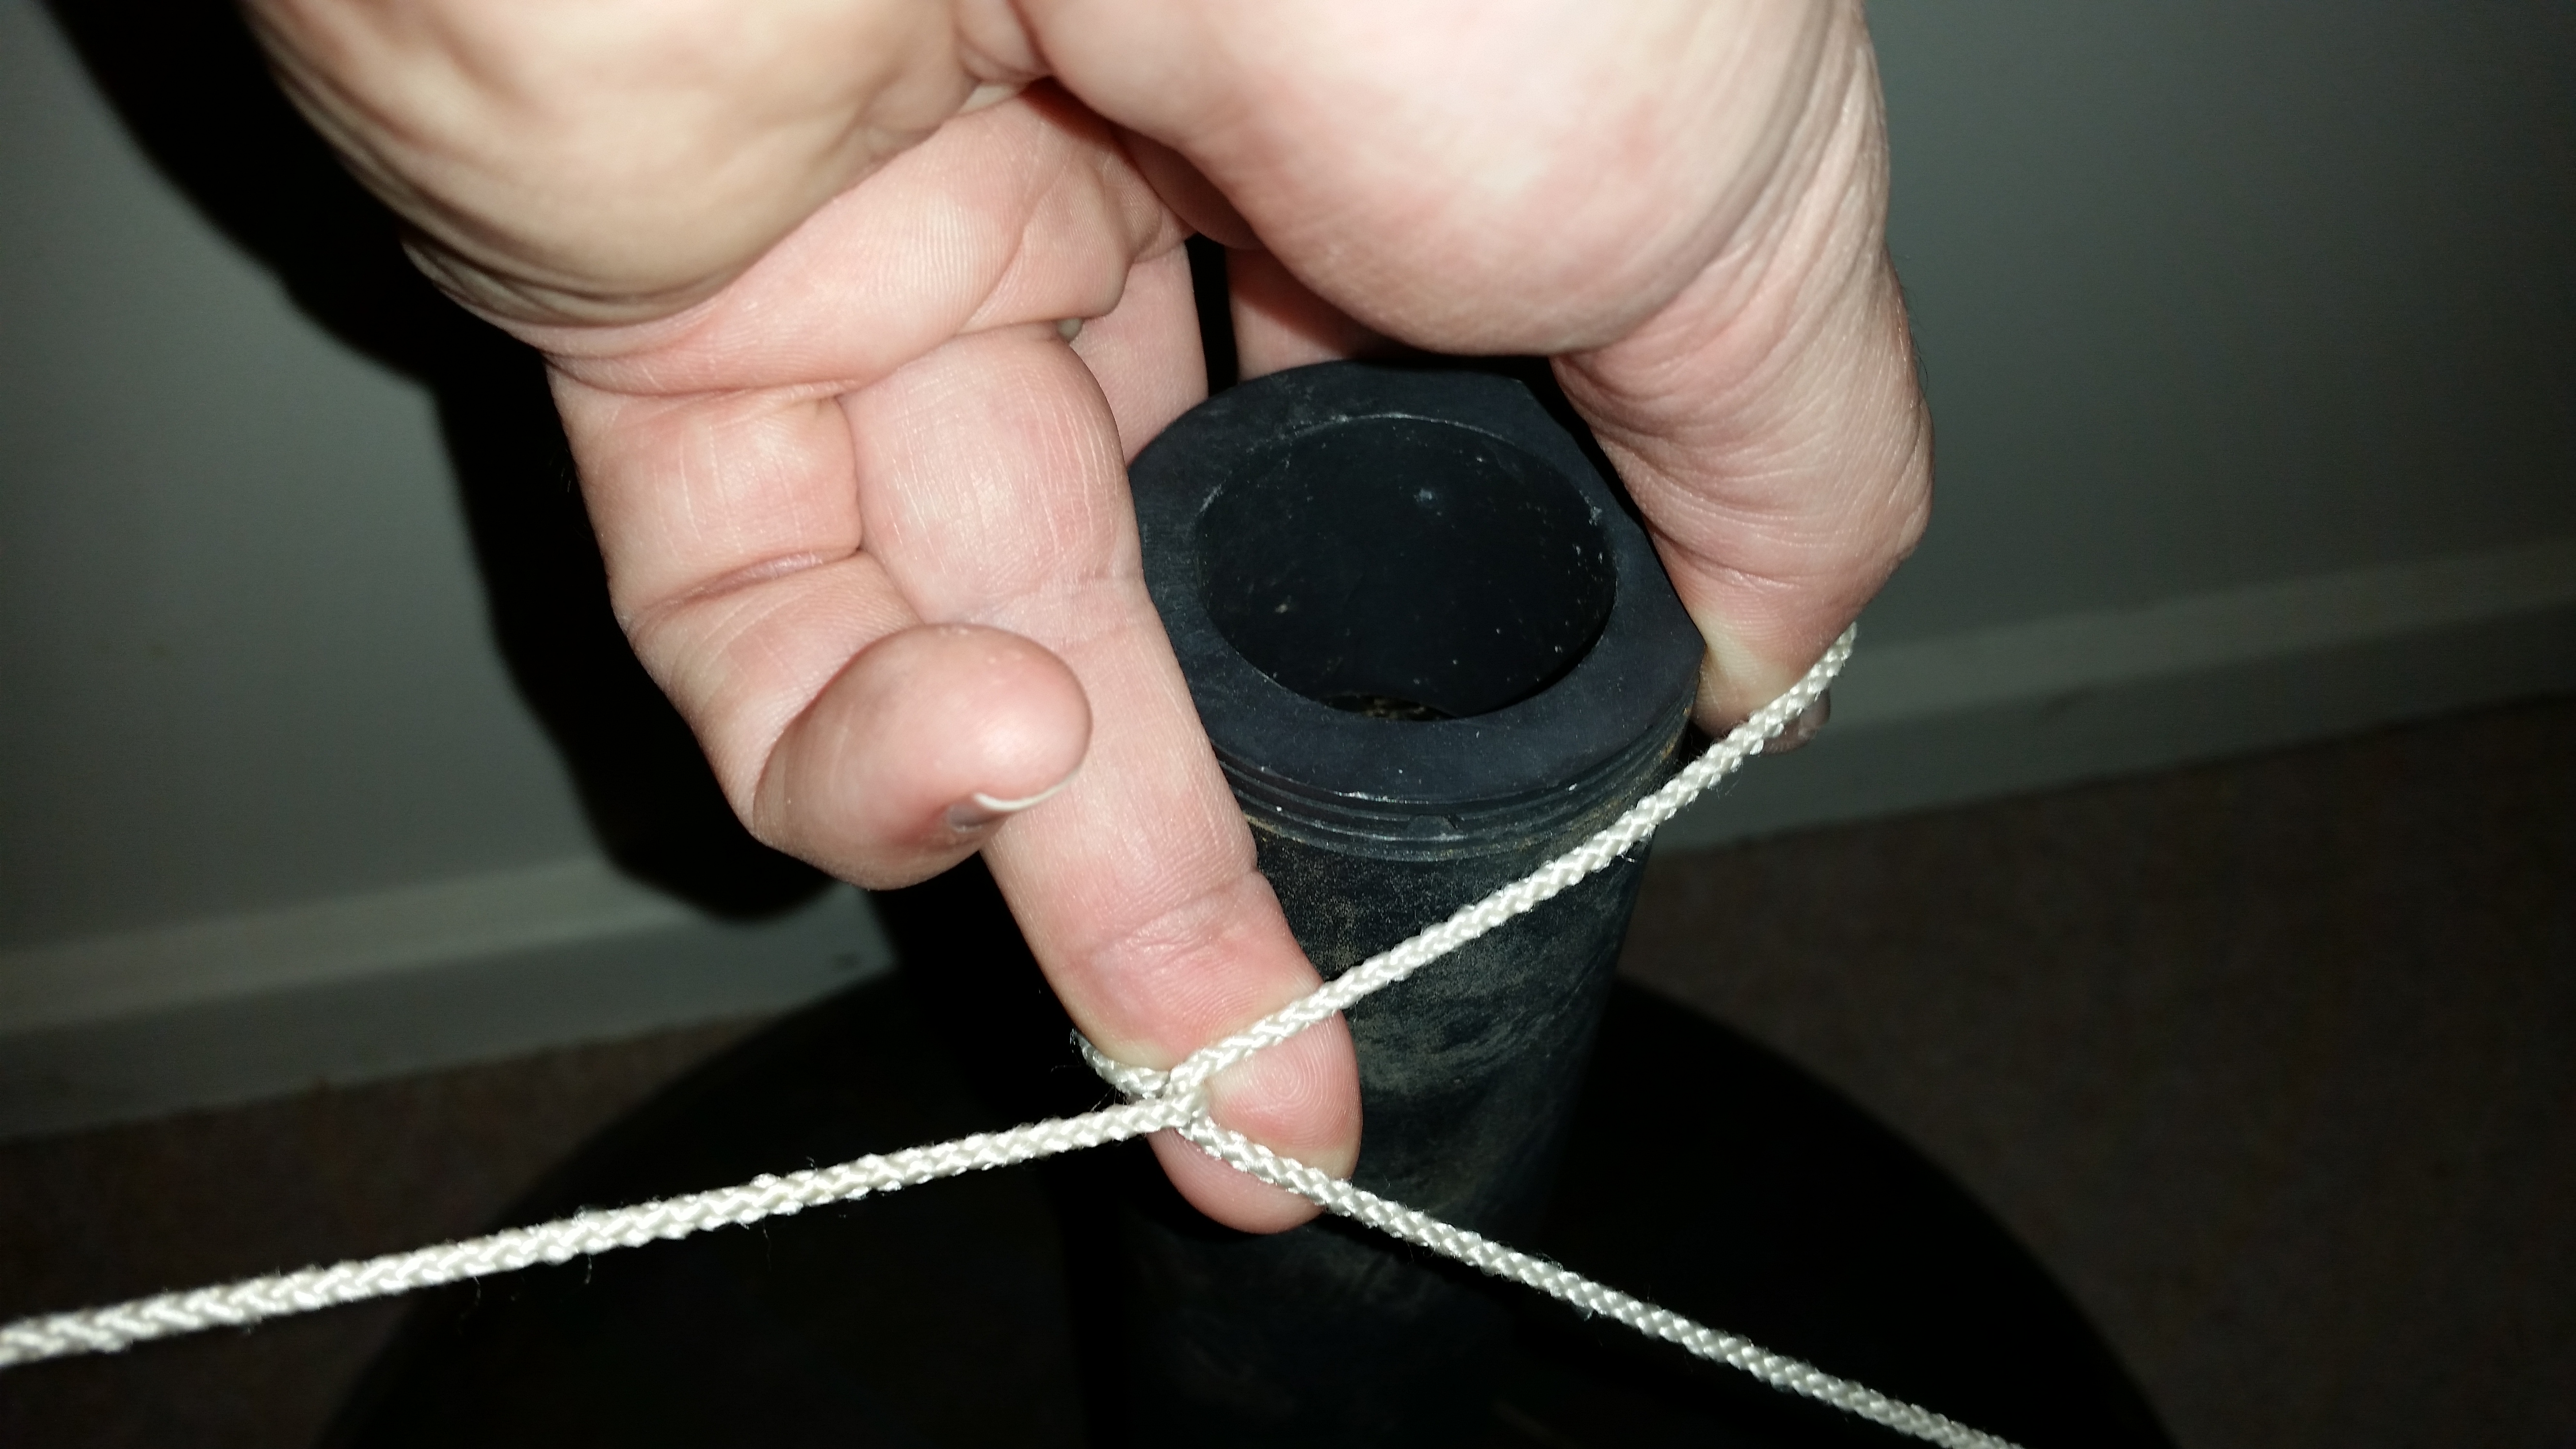
1. Basic Wrap (non-locking)
This first wrap is not really considered a proper wrap by most experienced wreck and cave divers. You just take the reel and line around a fixed object once (hence the term wrap) without locking it off and continue onwards. This is often one of the first wraps people are taught by others early on in their diving career but without locking off the line it will probably slip. Although you can get away with doing one of these every now and again amongst other properly locked wraps, it’s generally discouraged and I’ve included it here more for comparison than anything else.
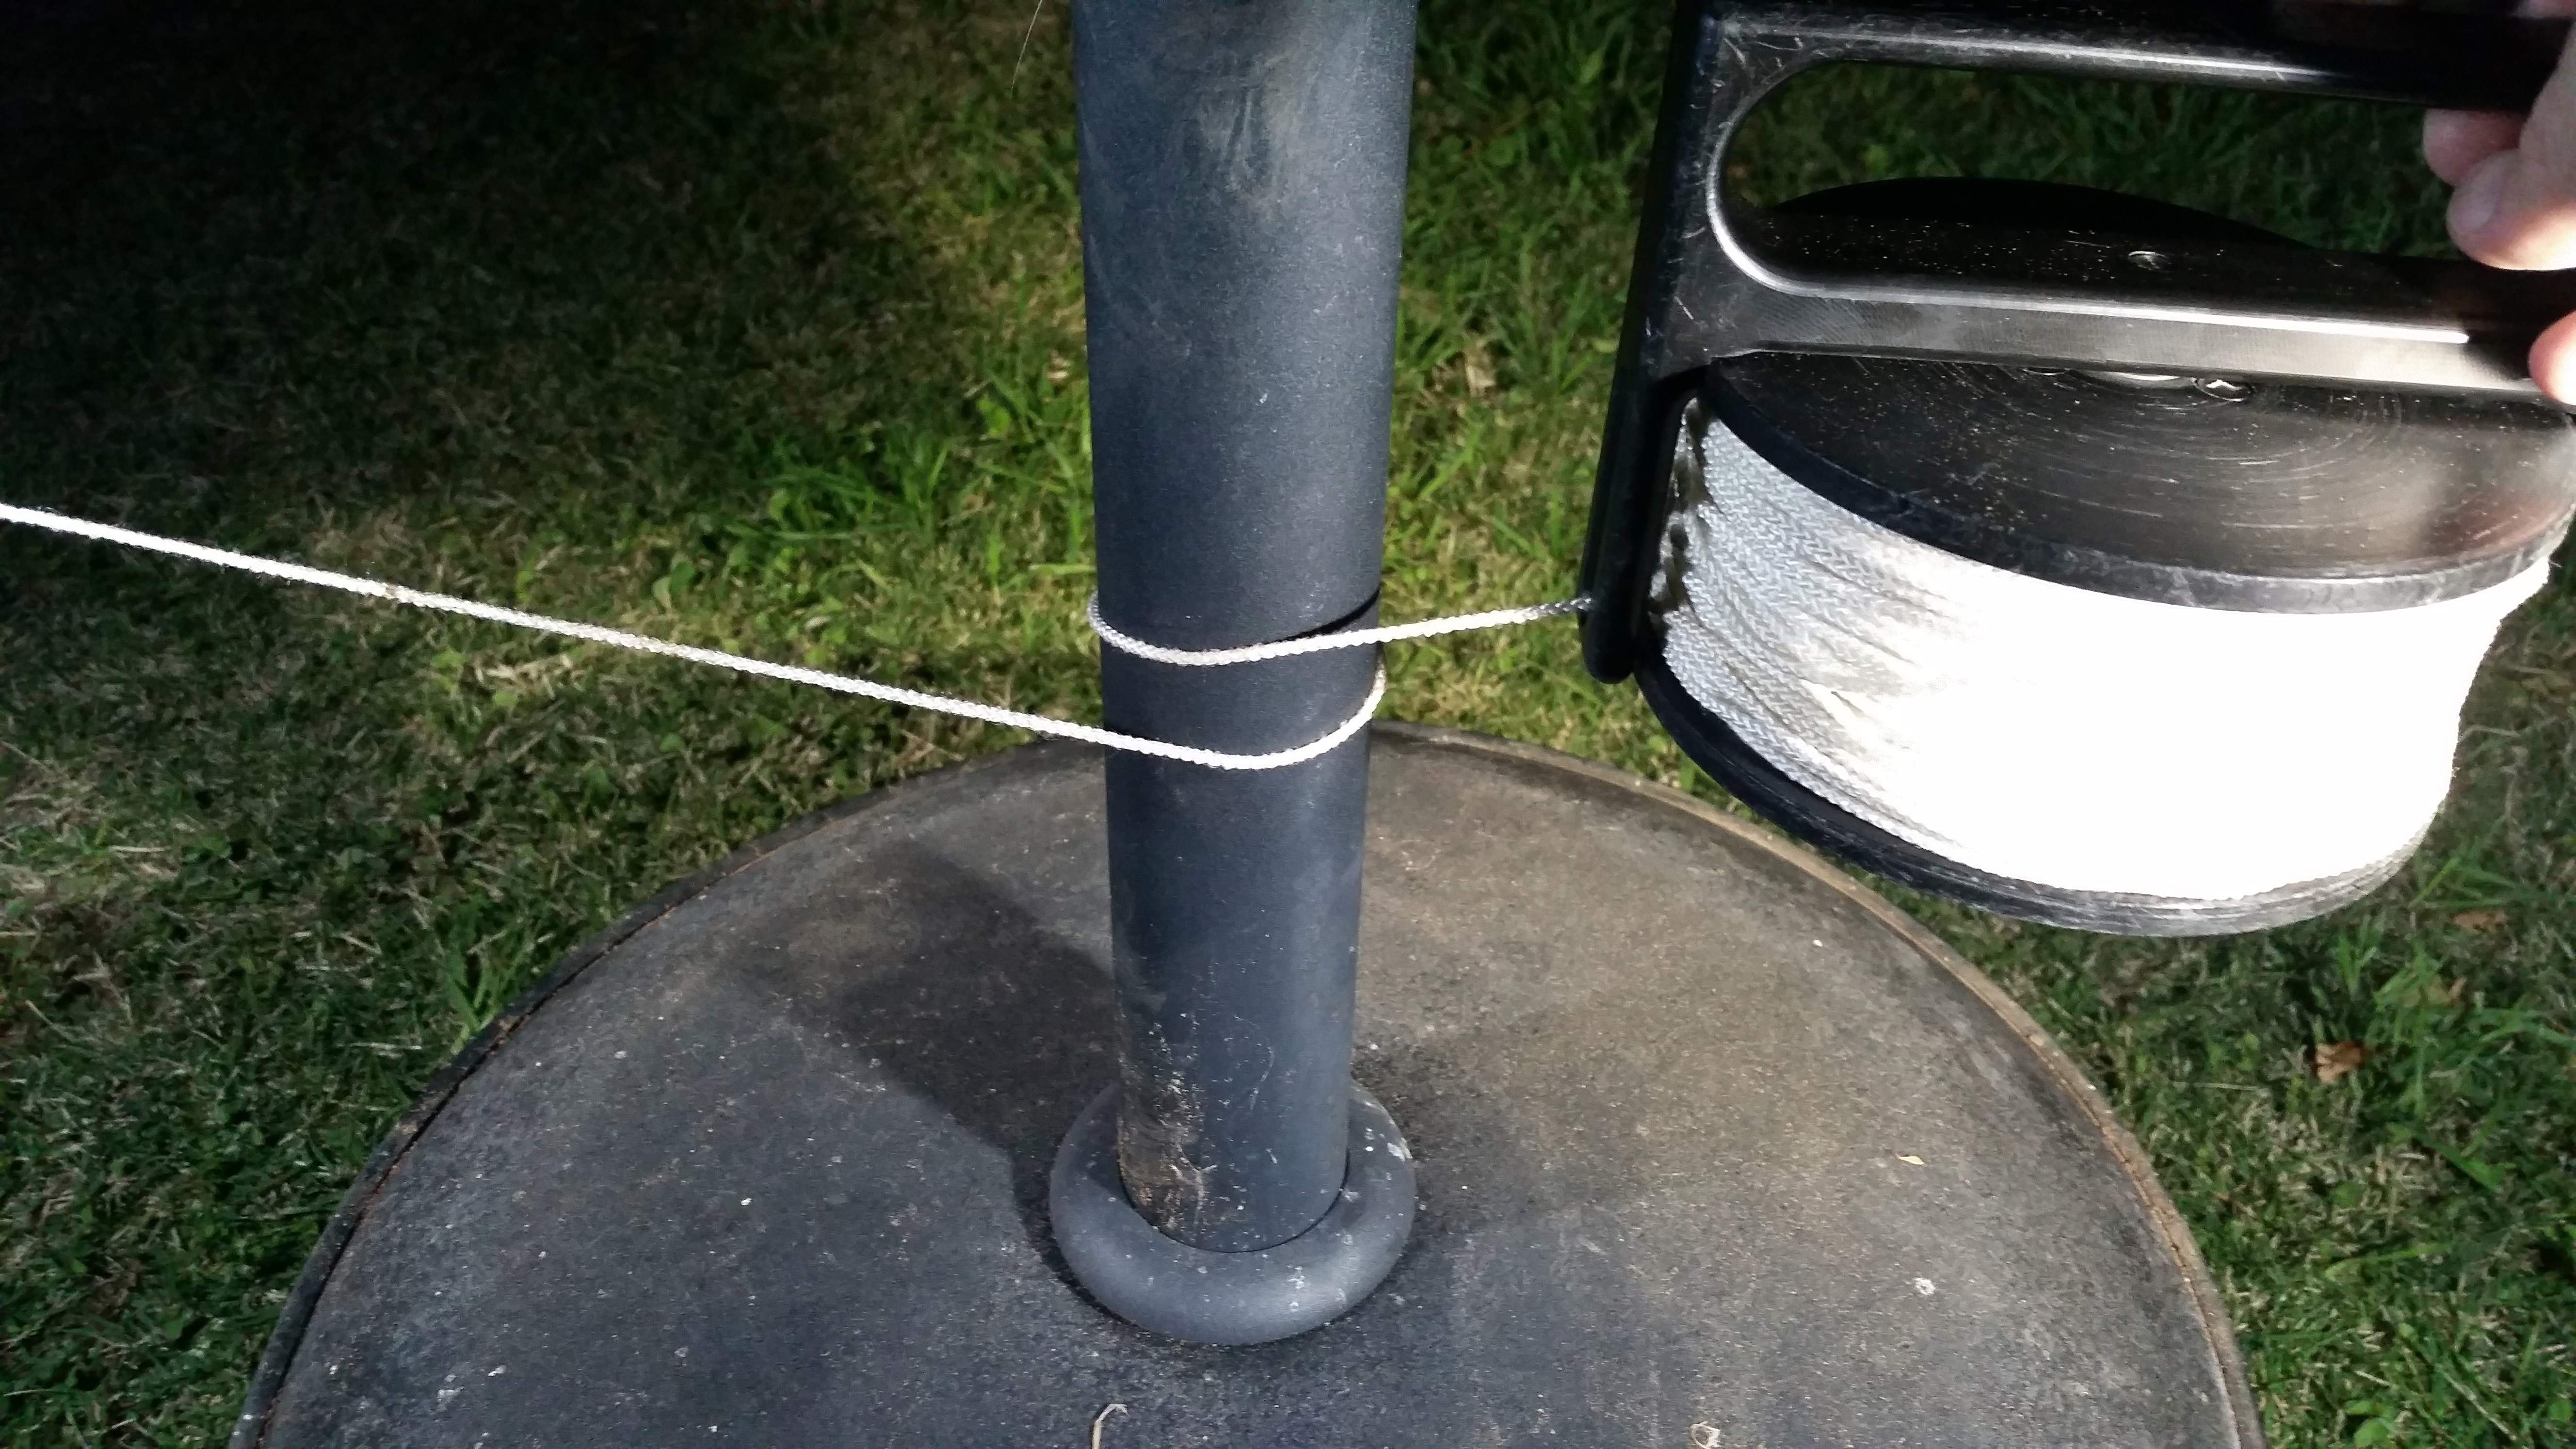
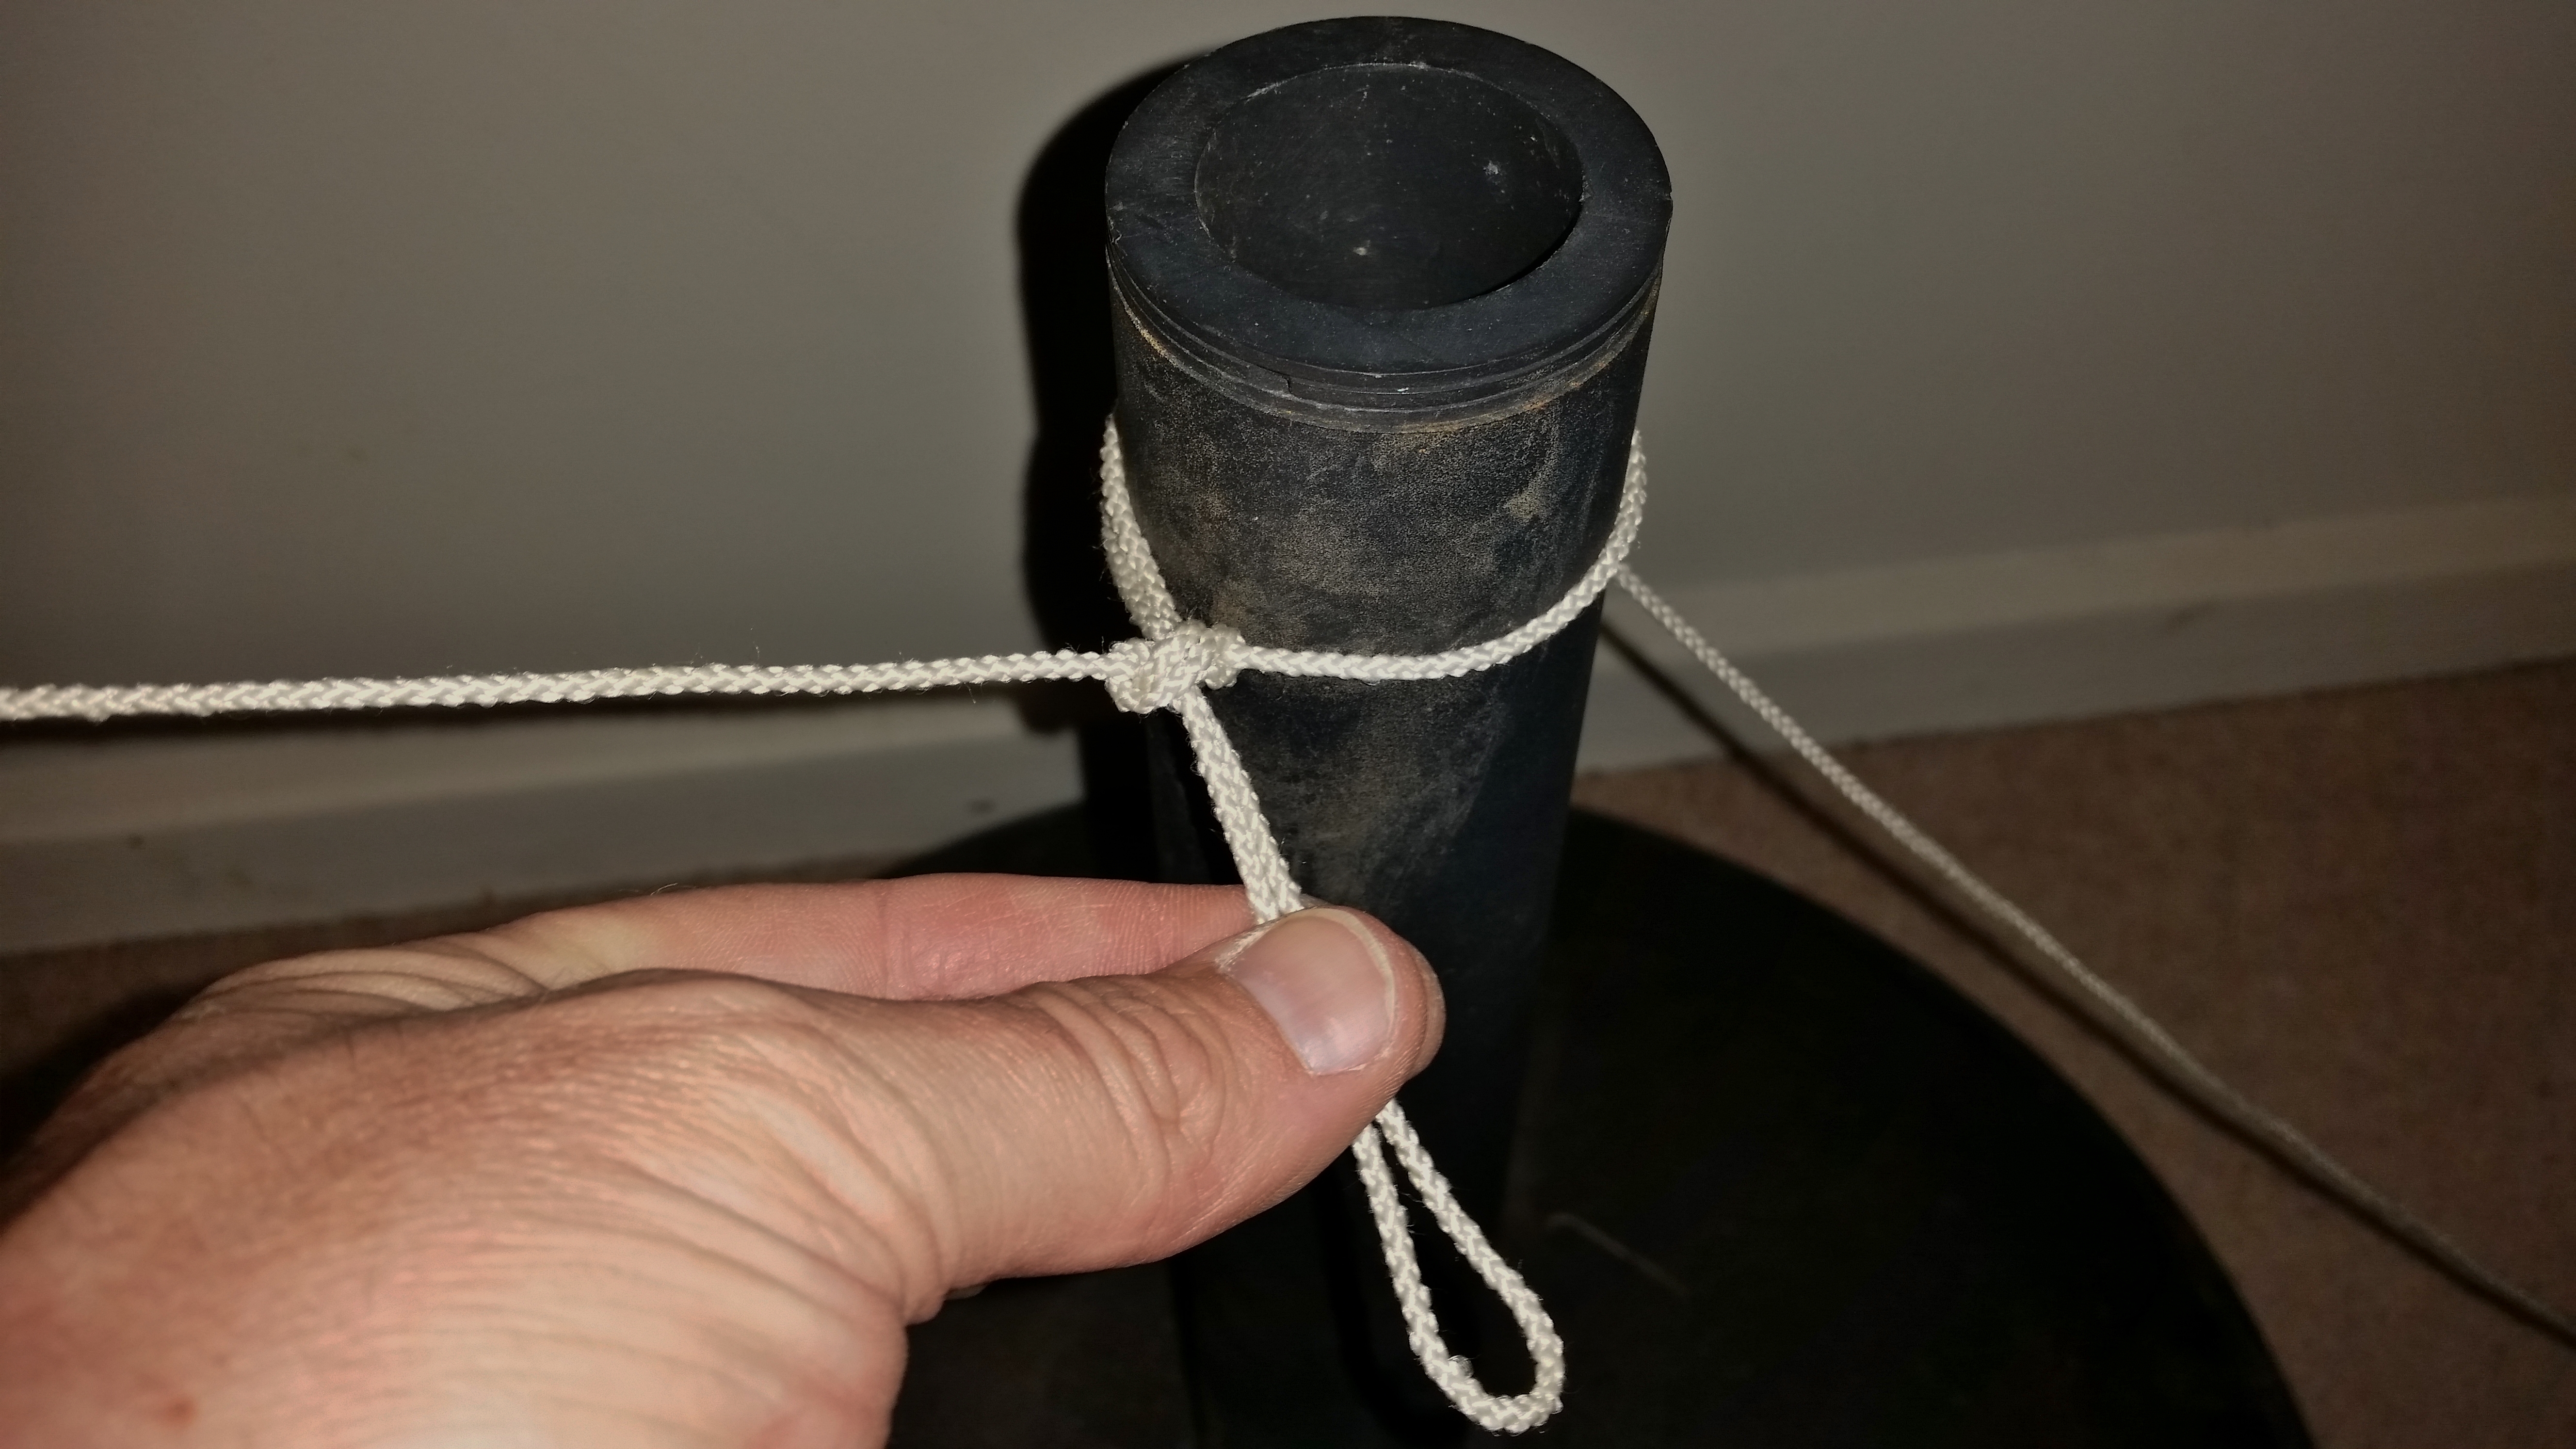
2. Locking Pull-Around Wrap
A significant improvement to the basic wrap is to take the reel and line around a fixed object once but then lock it off by also passing it under the line on the side from which you came in from. This added friction means that the wrap is less likely to slip. You then pull the wrap taught and continue onwards.
3. Single-Handed Wrap
If the object you are trying to wrap the guideline around is small enough and if it has a protruding end (something sticking out as opposed to something enclosed like the rung of a ladder or similar) then you may prefer to put the Locking Pull-Around Wrap on by using a single hand to take a bight of the line, turn it a full 360 degrees and placing it on the small protruding object.
4. Double Single-Handed Wrap
For a more secure version of the Single-Handed Wrap you simply do it twice, placing one wrap directly on top of or above the other on the same protruding object
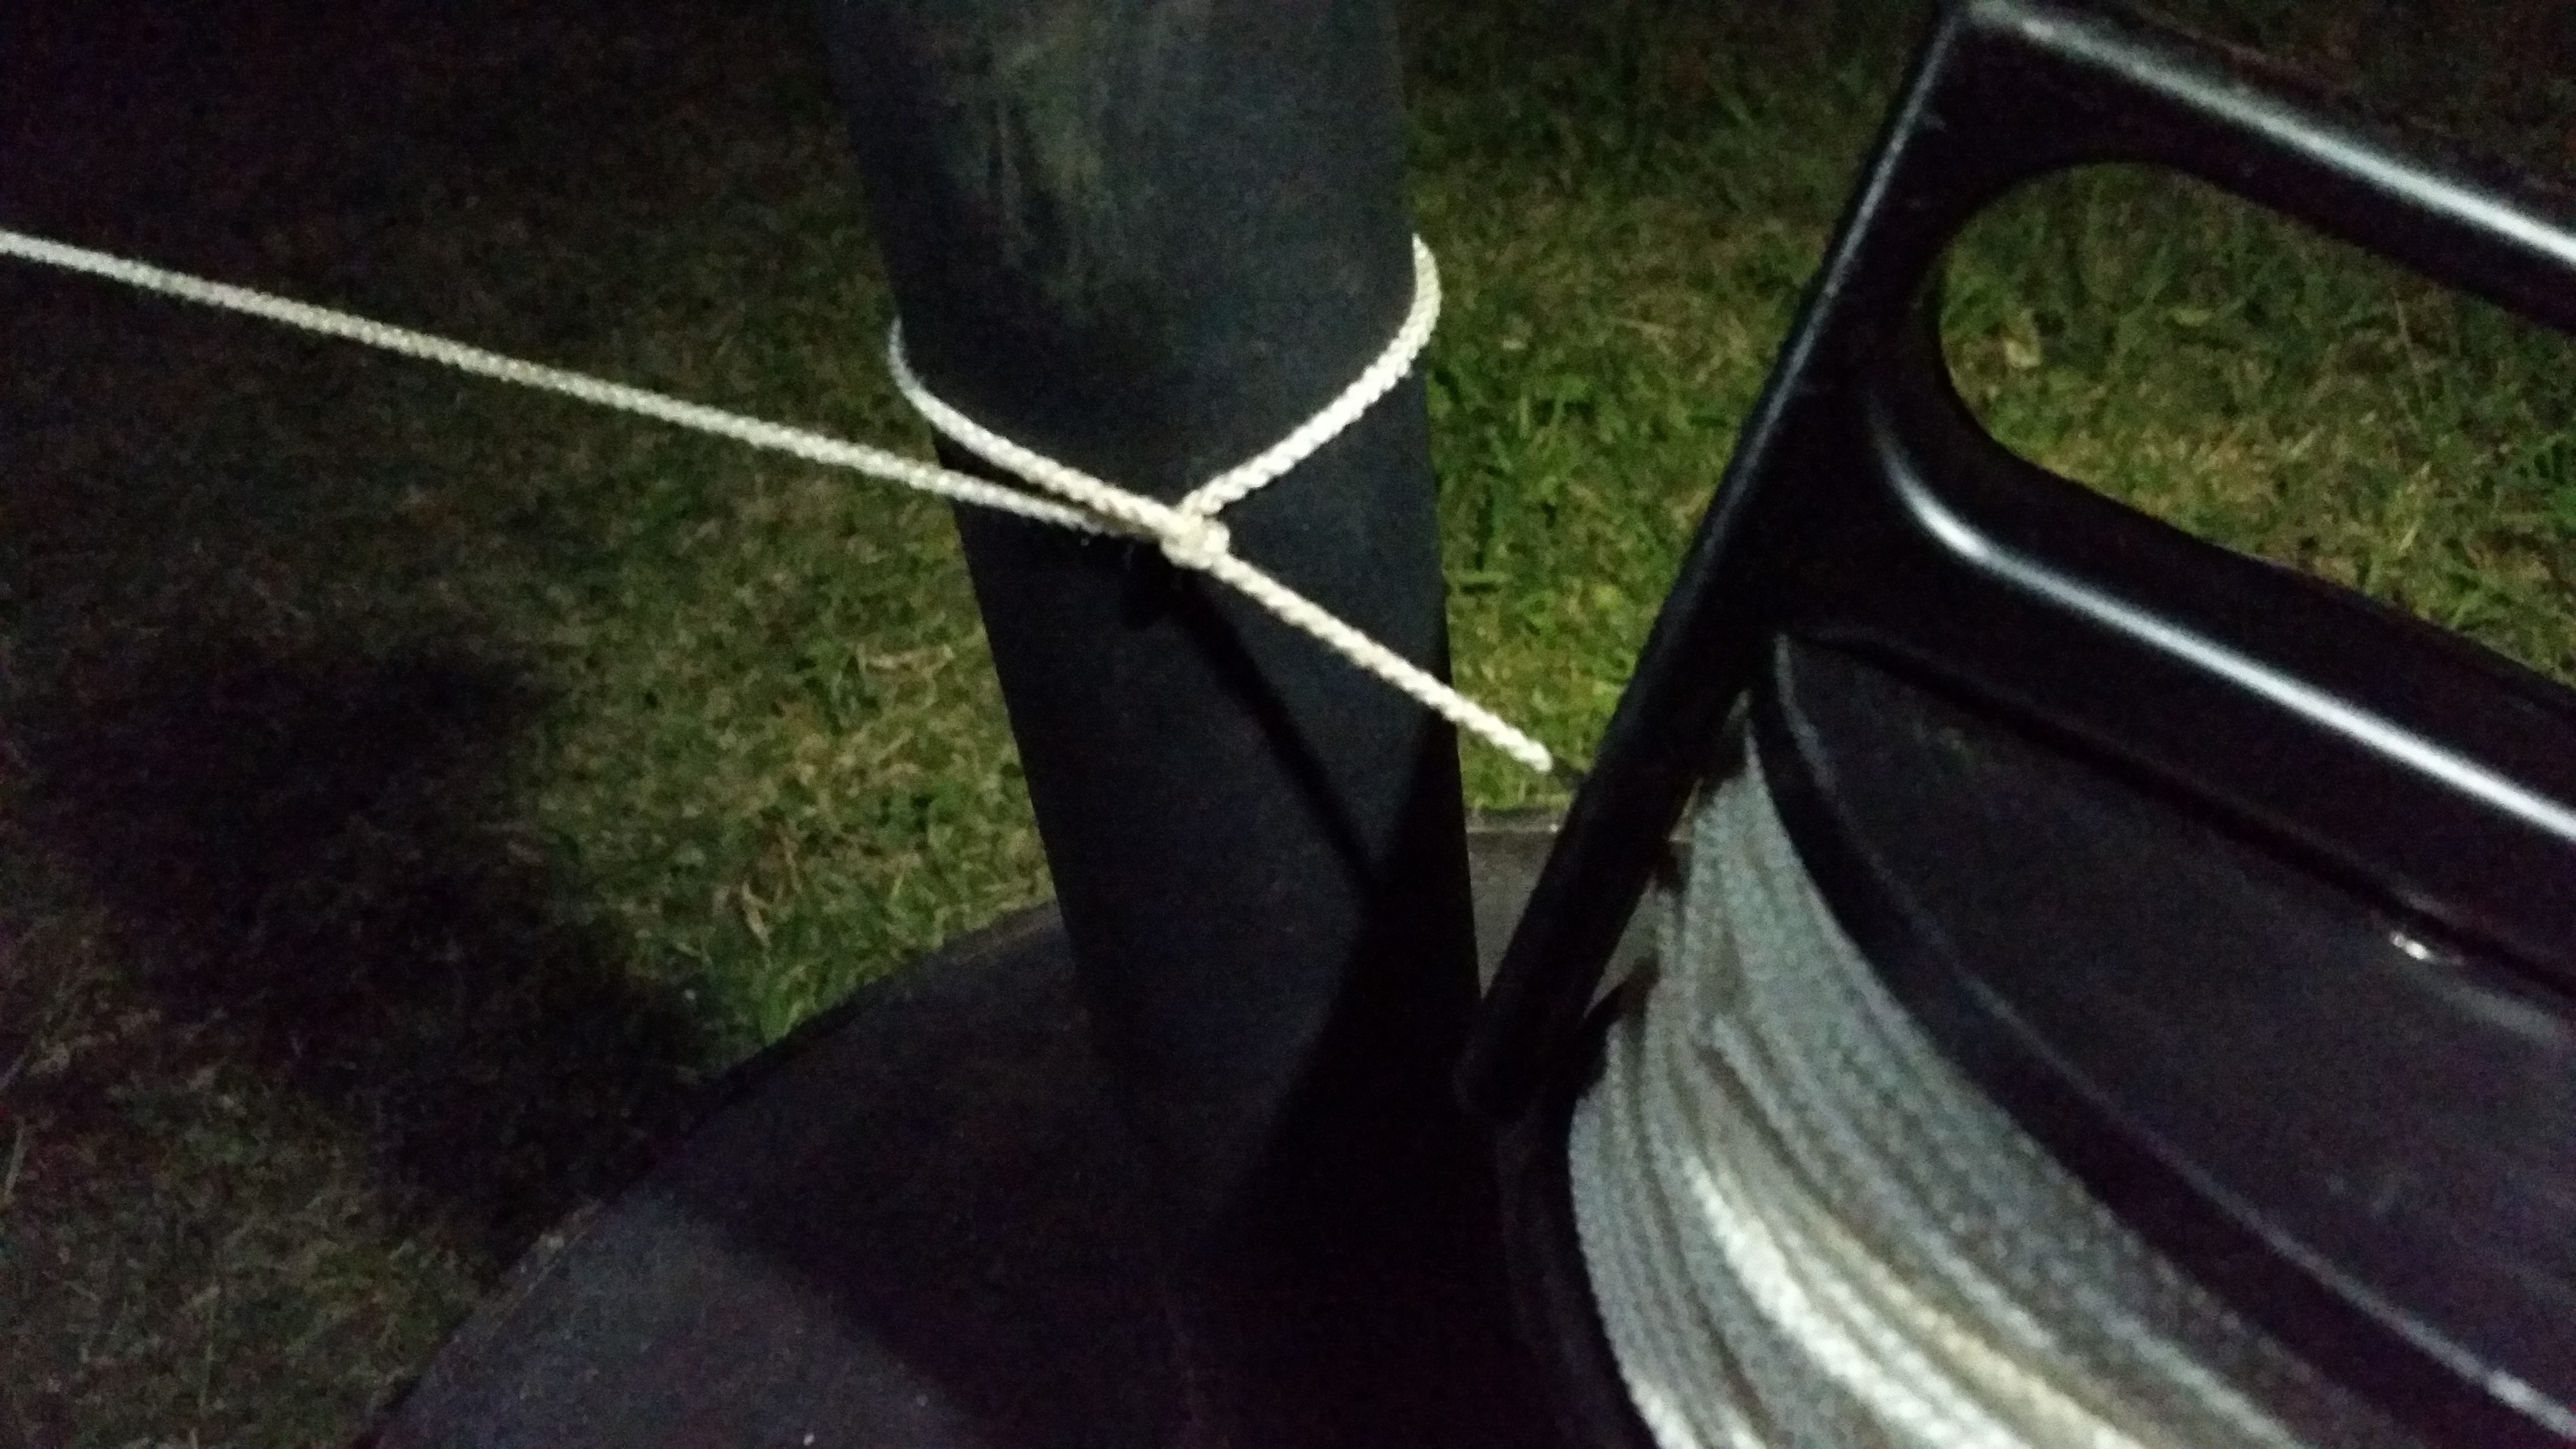
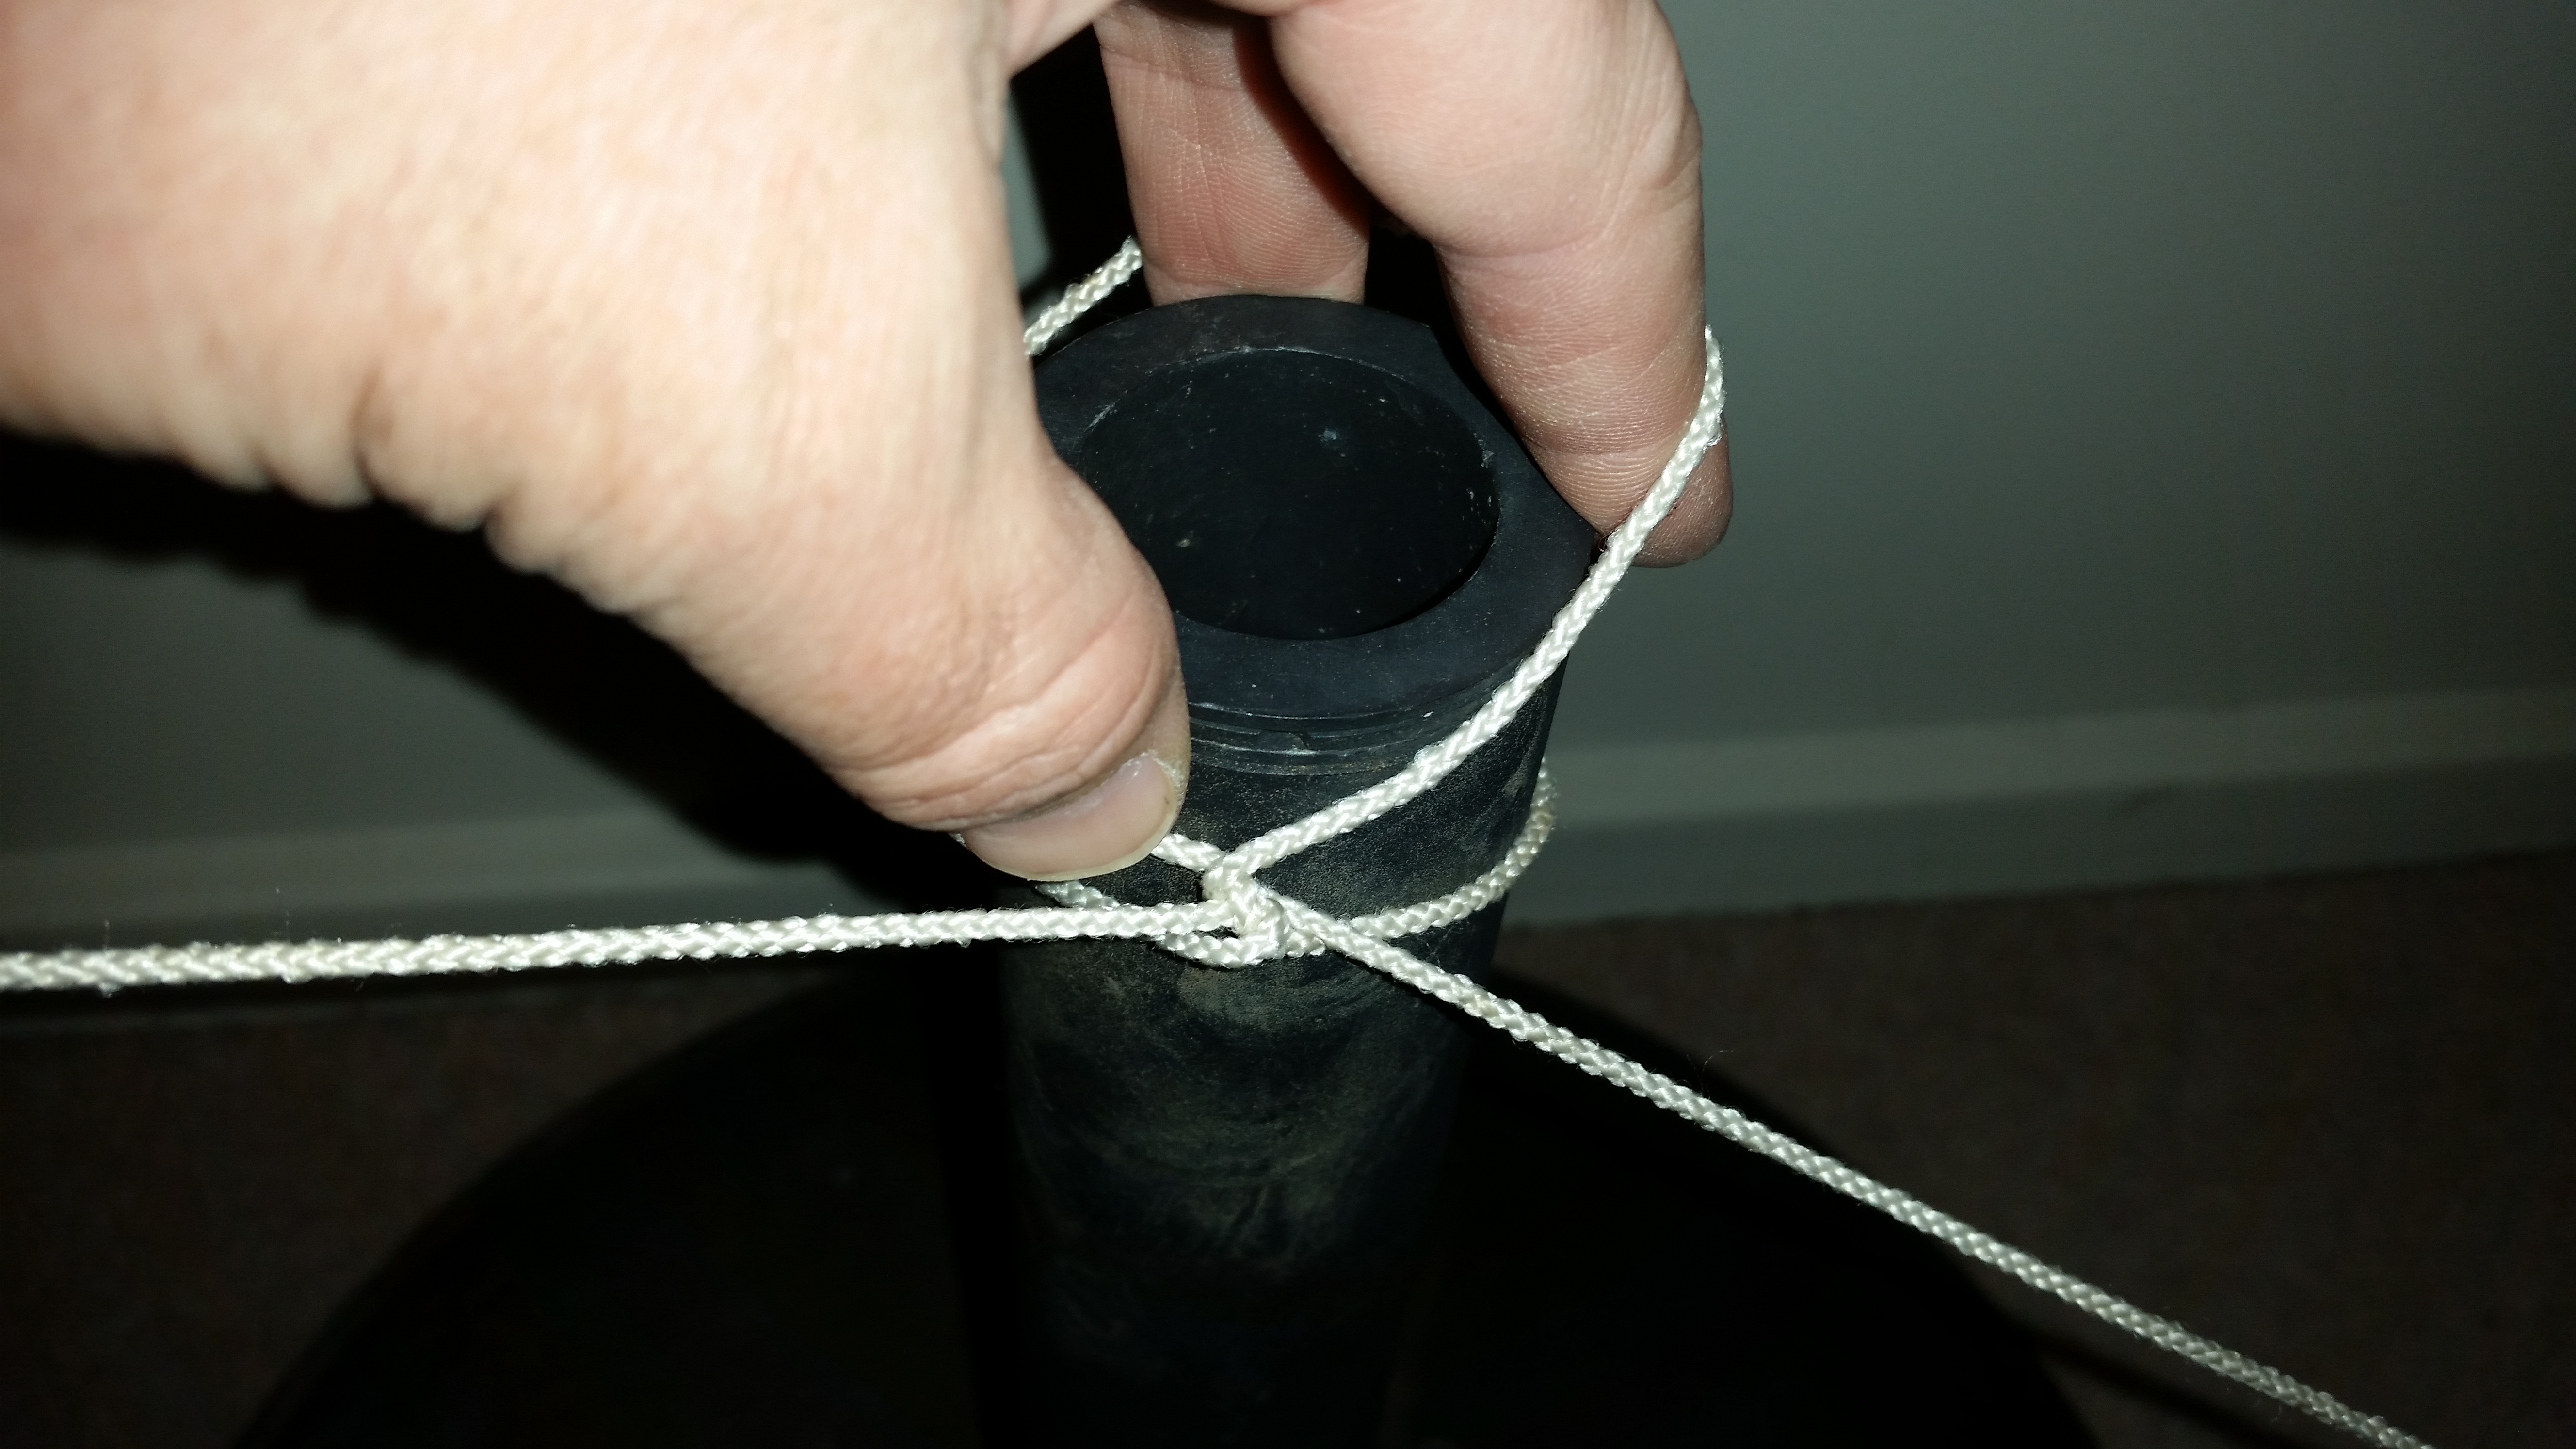
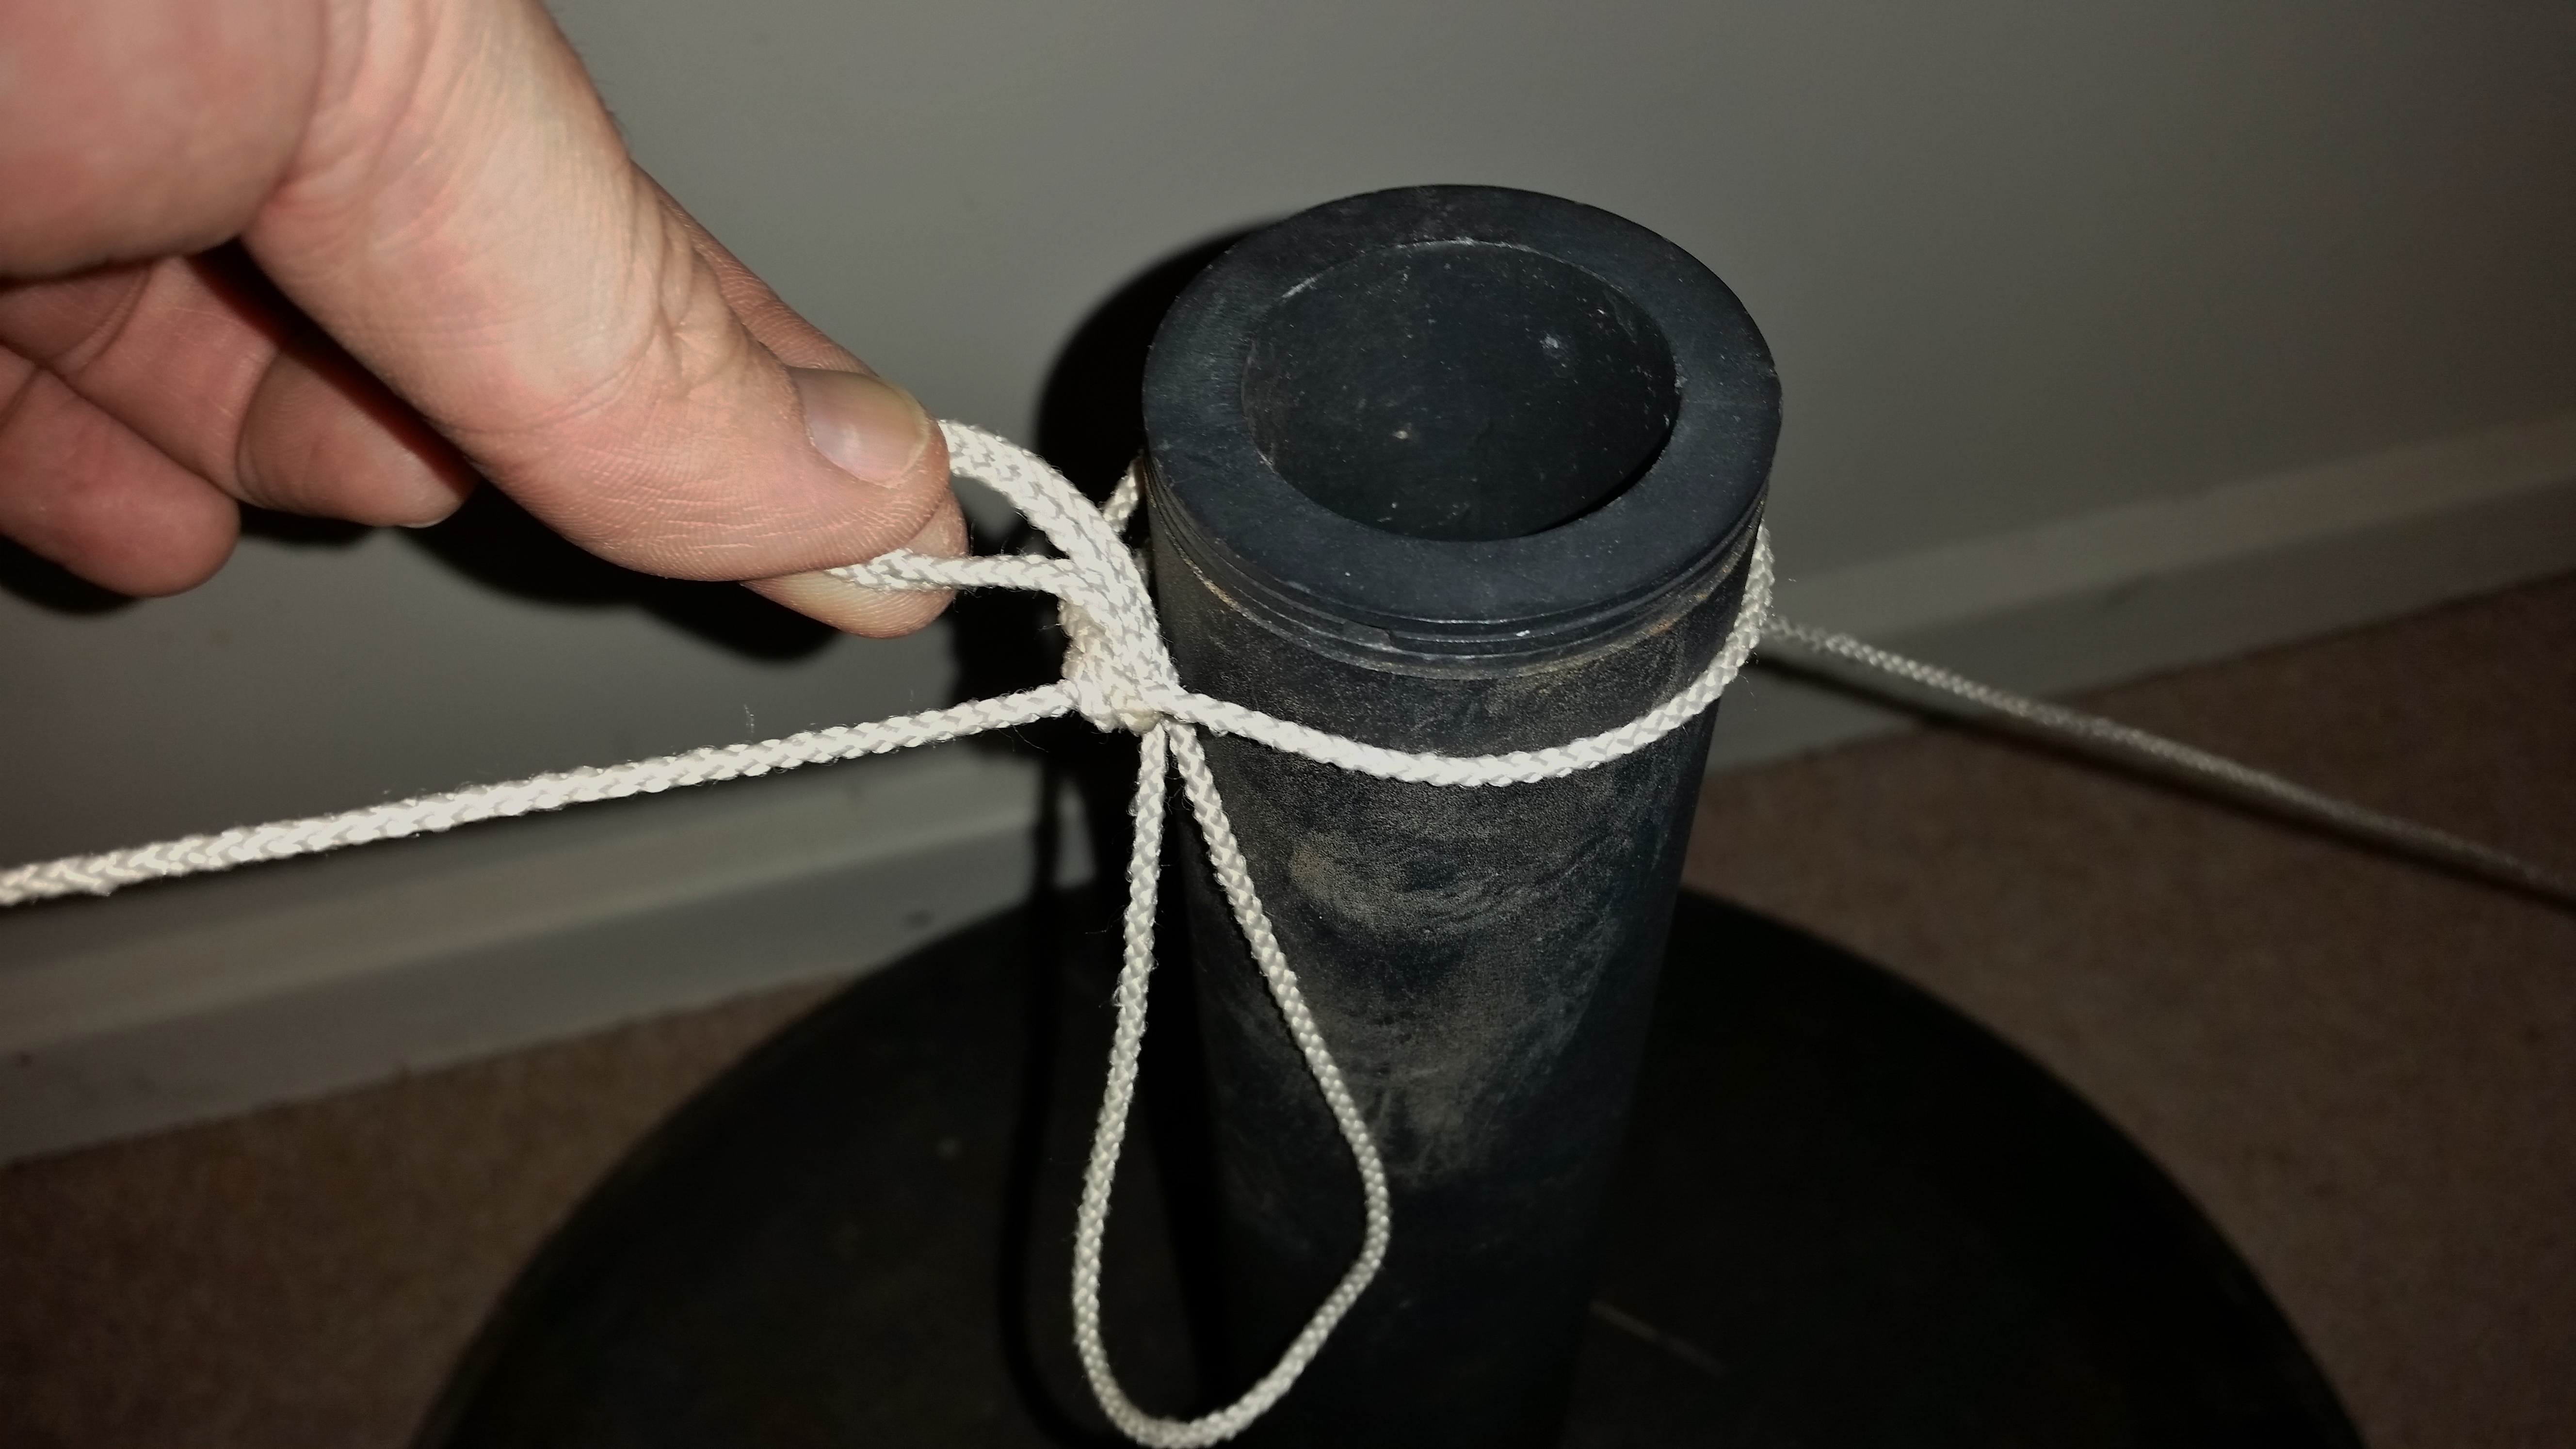
5. Locking Double Pull-Around Wrap
One of the most common wraps used in wreck and cave diving is a more secure version of the Locking Pull-Around Wrap. Instead of taking it around an object once though you take it around twice before passing it under the line on the side from which you came in from. This has both the friction of line against the object it’s wrapped around and also against itself by locking it off.
6. Over-Under Wrap
This is actually pretty much the same as the Locking Double Pull-Around Wrap but it’s just applied a different way. This method is suitable though only to protruding objects, not enclosed ones and when the wrap is attached fairly close to the end of the object. You take the line twice around the object and and then with your other hand go to the line coming into the object (the side of the object the direction from which you have come) and take that line back over the top of the protruding object and hence locking off the two wraps.
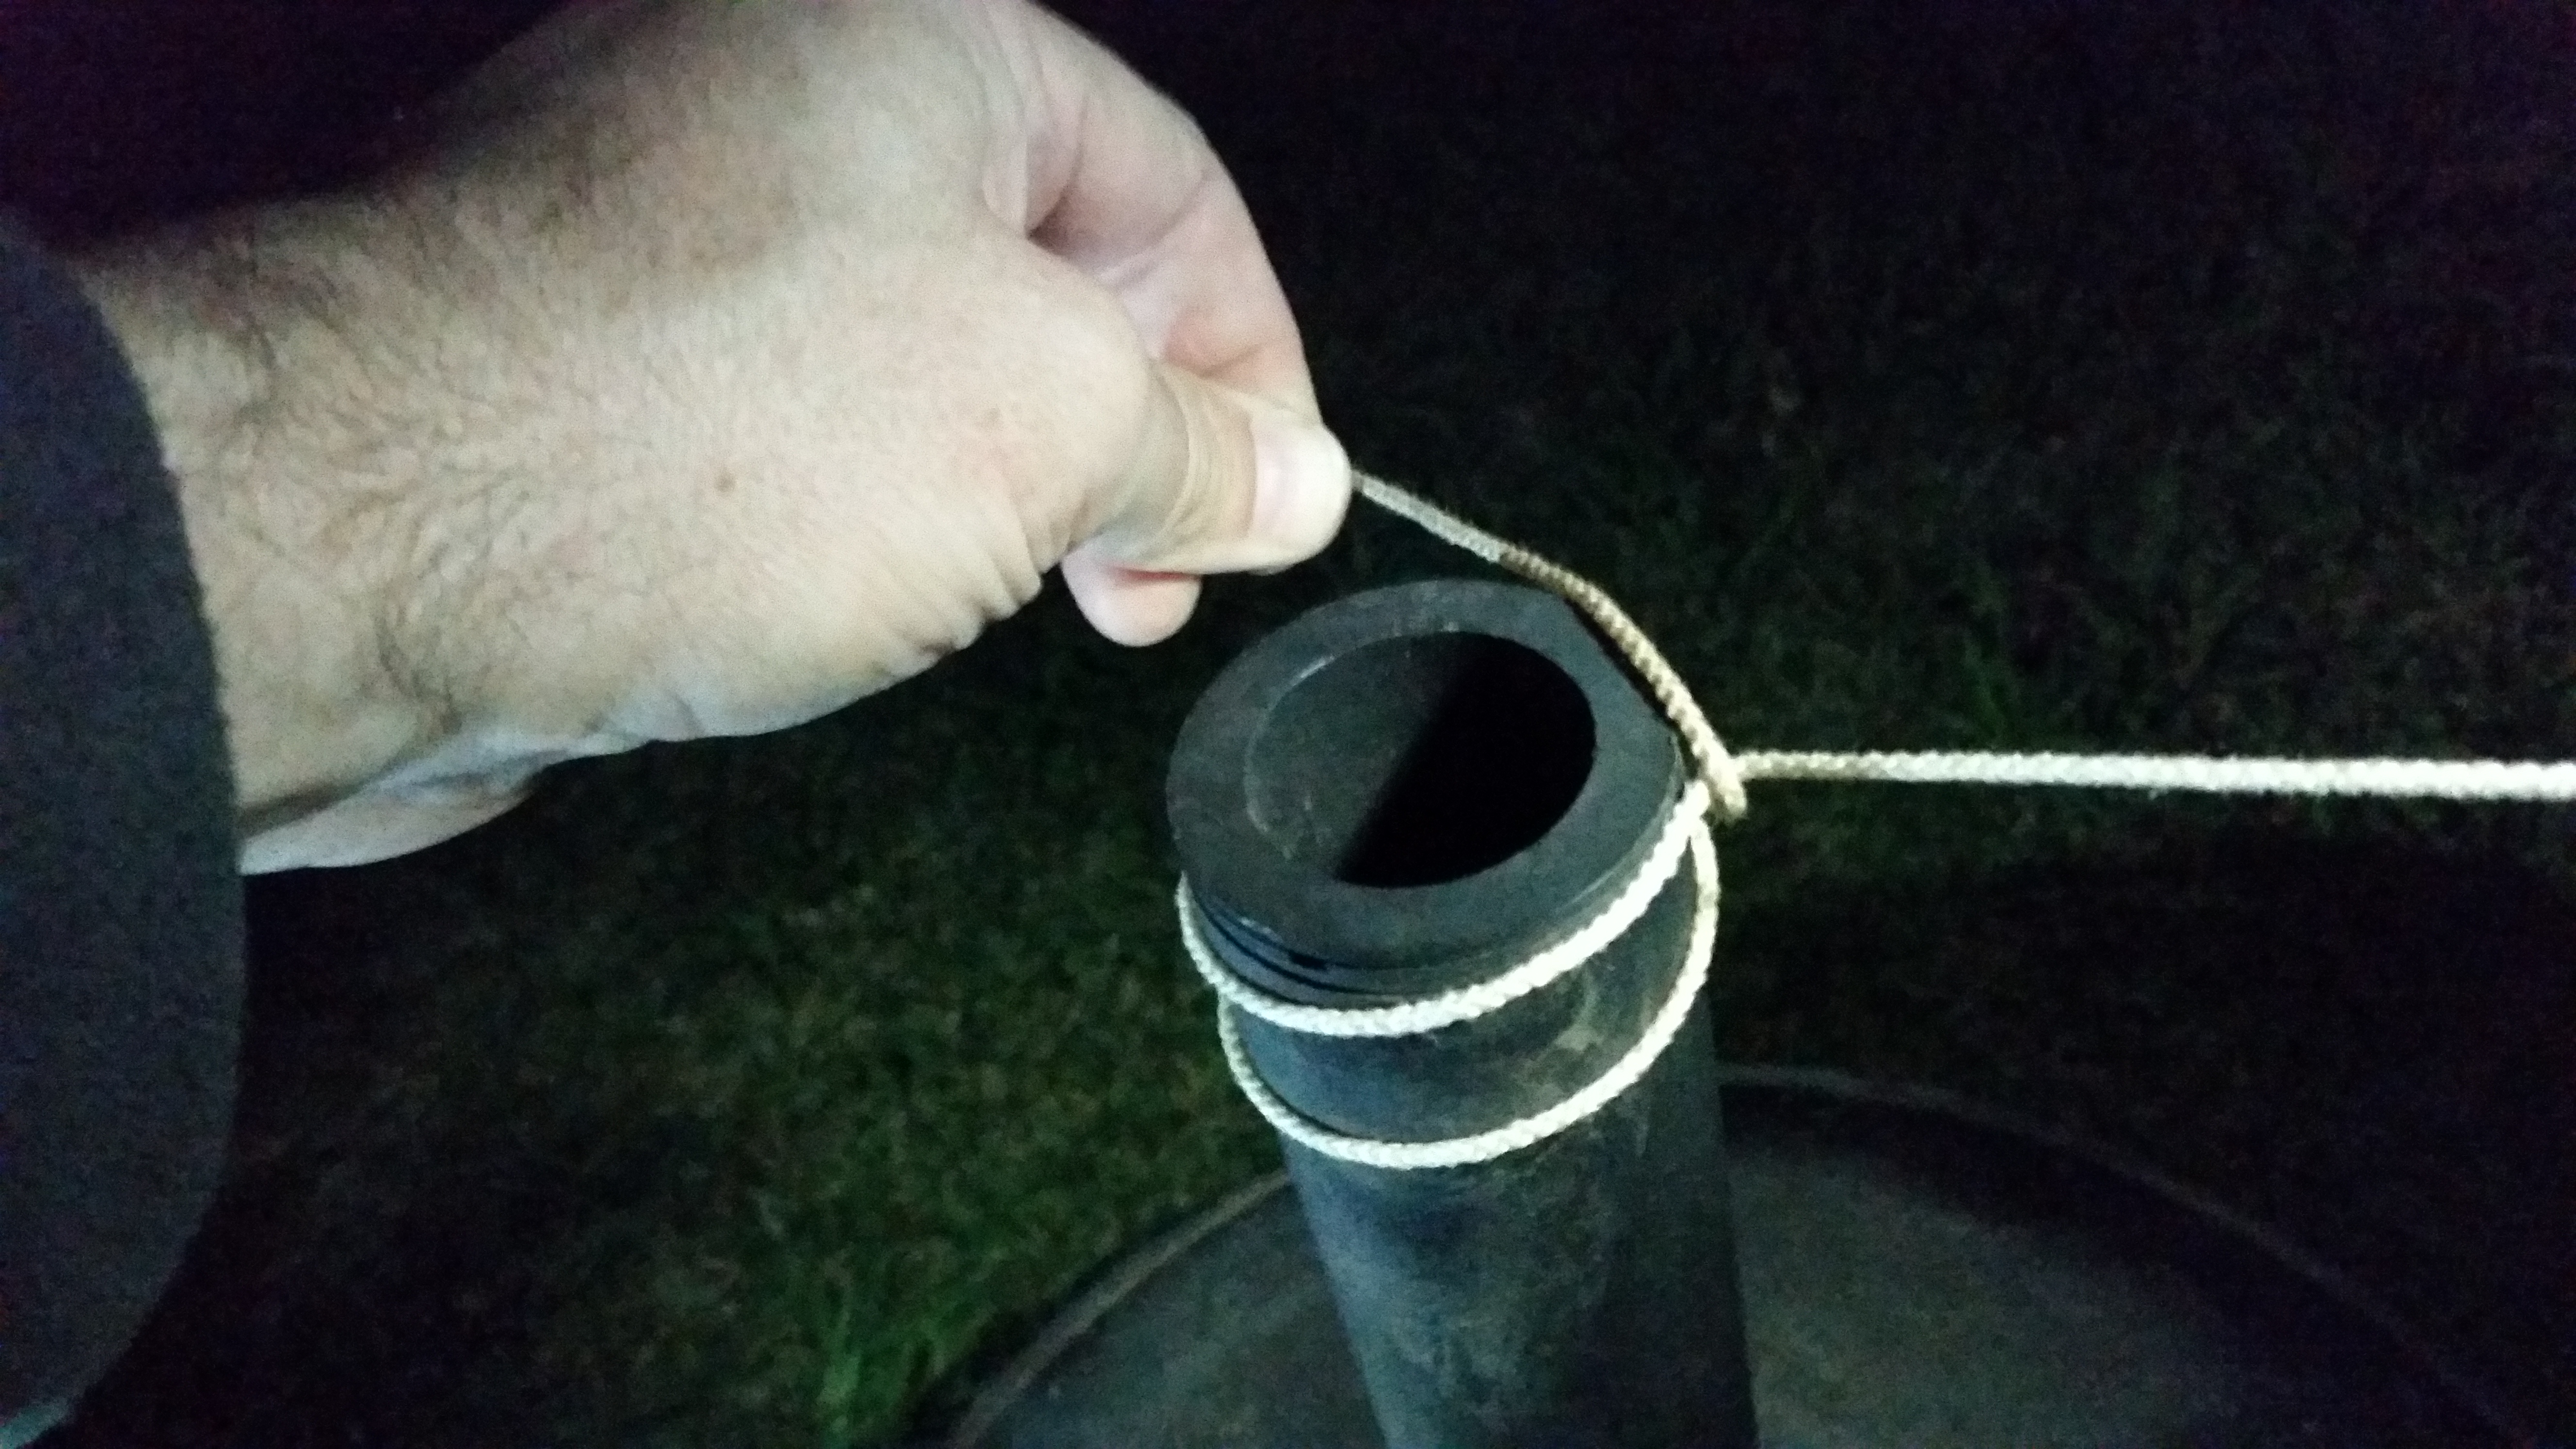
7. Tie Off (Secure)
There are times when there may be insufficient large objects to wrap the guideline and entire reel round and no suitable small protruding ones. However an opportunity may present with small holes or eyelets that although you can’t fit the body of the reel itself through, a bight of the line will. Such a situation is suited to using a proper tie off. Extend a suitable length bight of the line. You may then wish to secure the reel by tightening the locking screw so that no loose line falls off whilst you are tying off (although this is personal preference). Extend the bight of the line over or under the object (or through the small hole or eyelet). Pull taught and place this bight back round and over the line going into the object, round and through the hole you have made, pull it through and then do a further half hitch on top to secure it. No need to pull it excessively tight as this should be sufficient and just remember that you will need to get it off on the way out again.
8. Quick Release Tie Off
If you want to do a tie off that you can get off easily there is a few different variations of a Quick Release Tie Off. You extend a sufficient bight of the line with which to do your tie off and again if you prefer, you can secure the locking screw so no loose line falls off the reel. Extend the bight of line, pass it over or under the object (or through the small hole or eyelet). Pull round and taught and place this bight over the line going into the object to which you are attempting to tie off, however you then create another bight (a bight in the bight if this makes sense to you). It’s this second bight that you take through the hole this time, with a tail sticking out the other end. With a bit of practice you should be able to simultaneously apply enough tension to both ends to secure this tie off and move away with it still in place but it is a little bit of a juggling act to get this one right. I’ve seen some divers take the bight around the line a second time before putting the quick release bight in the hole. This provides more friction and ultimately both versions done properly permit a quick release tie off that is easy to remove on the way out. However it’s also a bit unreliable in my opinion and you may recall how I prefaced this section:
If tie off’s go on easily, stay on without slipping and come off easily when desired then generally they are suitable.
This being the case the quick release tie off fails on at least two of those points! In practice I don’t use them, but feel free to experiment and see if you can address those other two points and develop a better version.
Primary and Secondary Tie Off’s
The terms Primary and Secondary Tie Off’s refer to the actual first place you attach your guideline and the one immediately after.
The Primary Tie Off is normally a suitable place to attach the end-loop of the reel by placing the line around a fixed object and then taking the body of the reel itself through the end-loop and subsequently pulling it tight. Voila! Consider your primary tie off done! I’ve seen some wrap this end a further two or three times around an object but aside from providing some sort of tactile reference this doesn’t really make the primary tie off any more secure. A primary tie off is normally done outside of the overhead environment so on a wreck an old bollard or something similar is more than adequate as one generally expects them to be pretty well secure. One of the rules of cave diving is maintaining a continuous unbroken line to the surface so generally the primary tie off is either done around a feature at the water’s edge itself, or if one first needs to descend in a sinkhole like formation before entering the overhead environment, it’s equally acceptable to do the primary tie of to the bottom of a shotline.
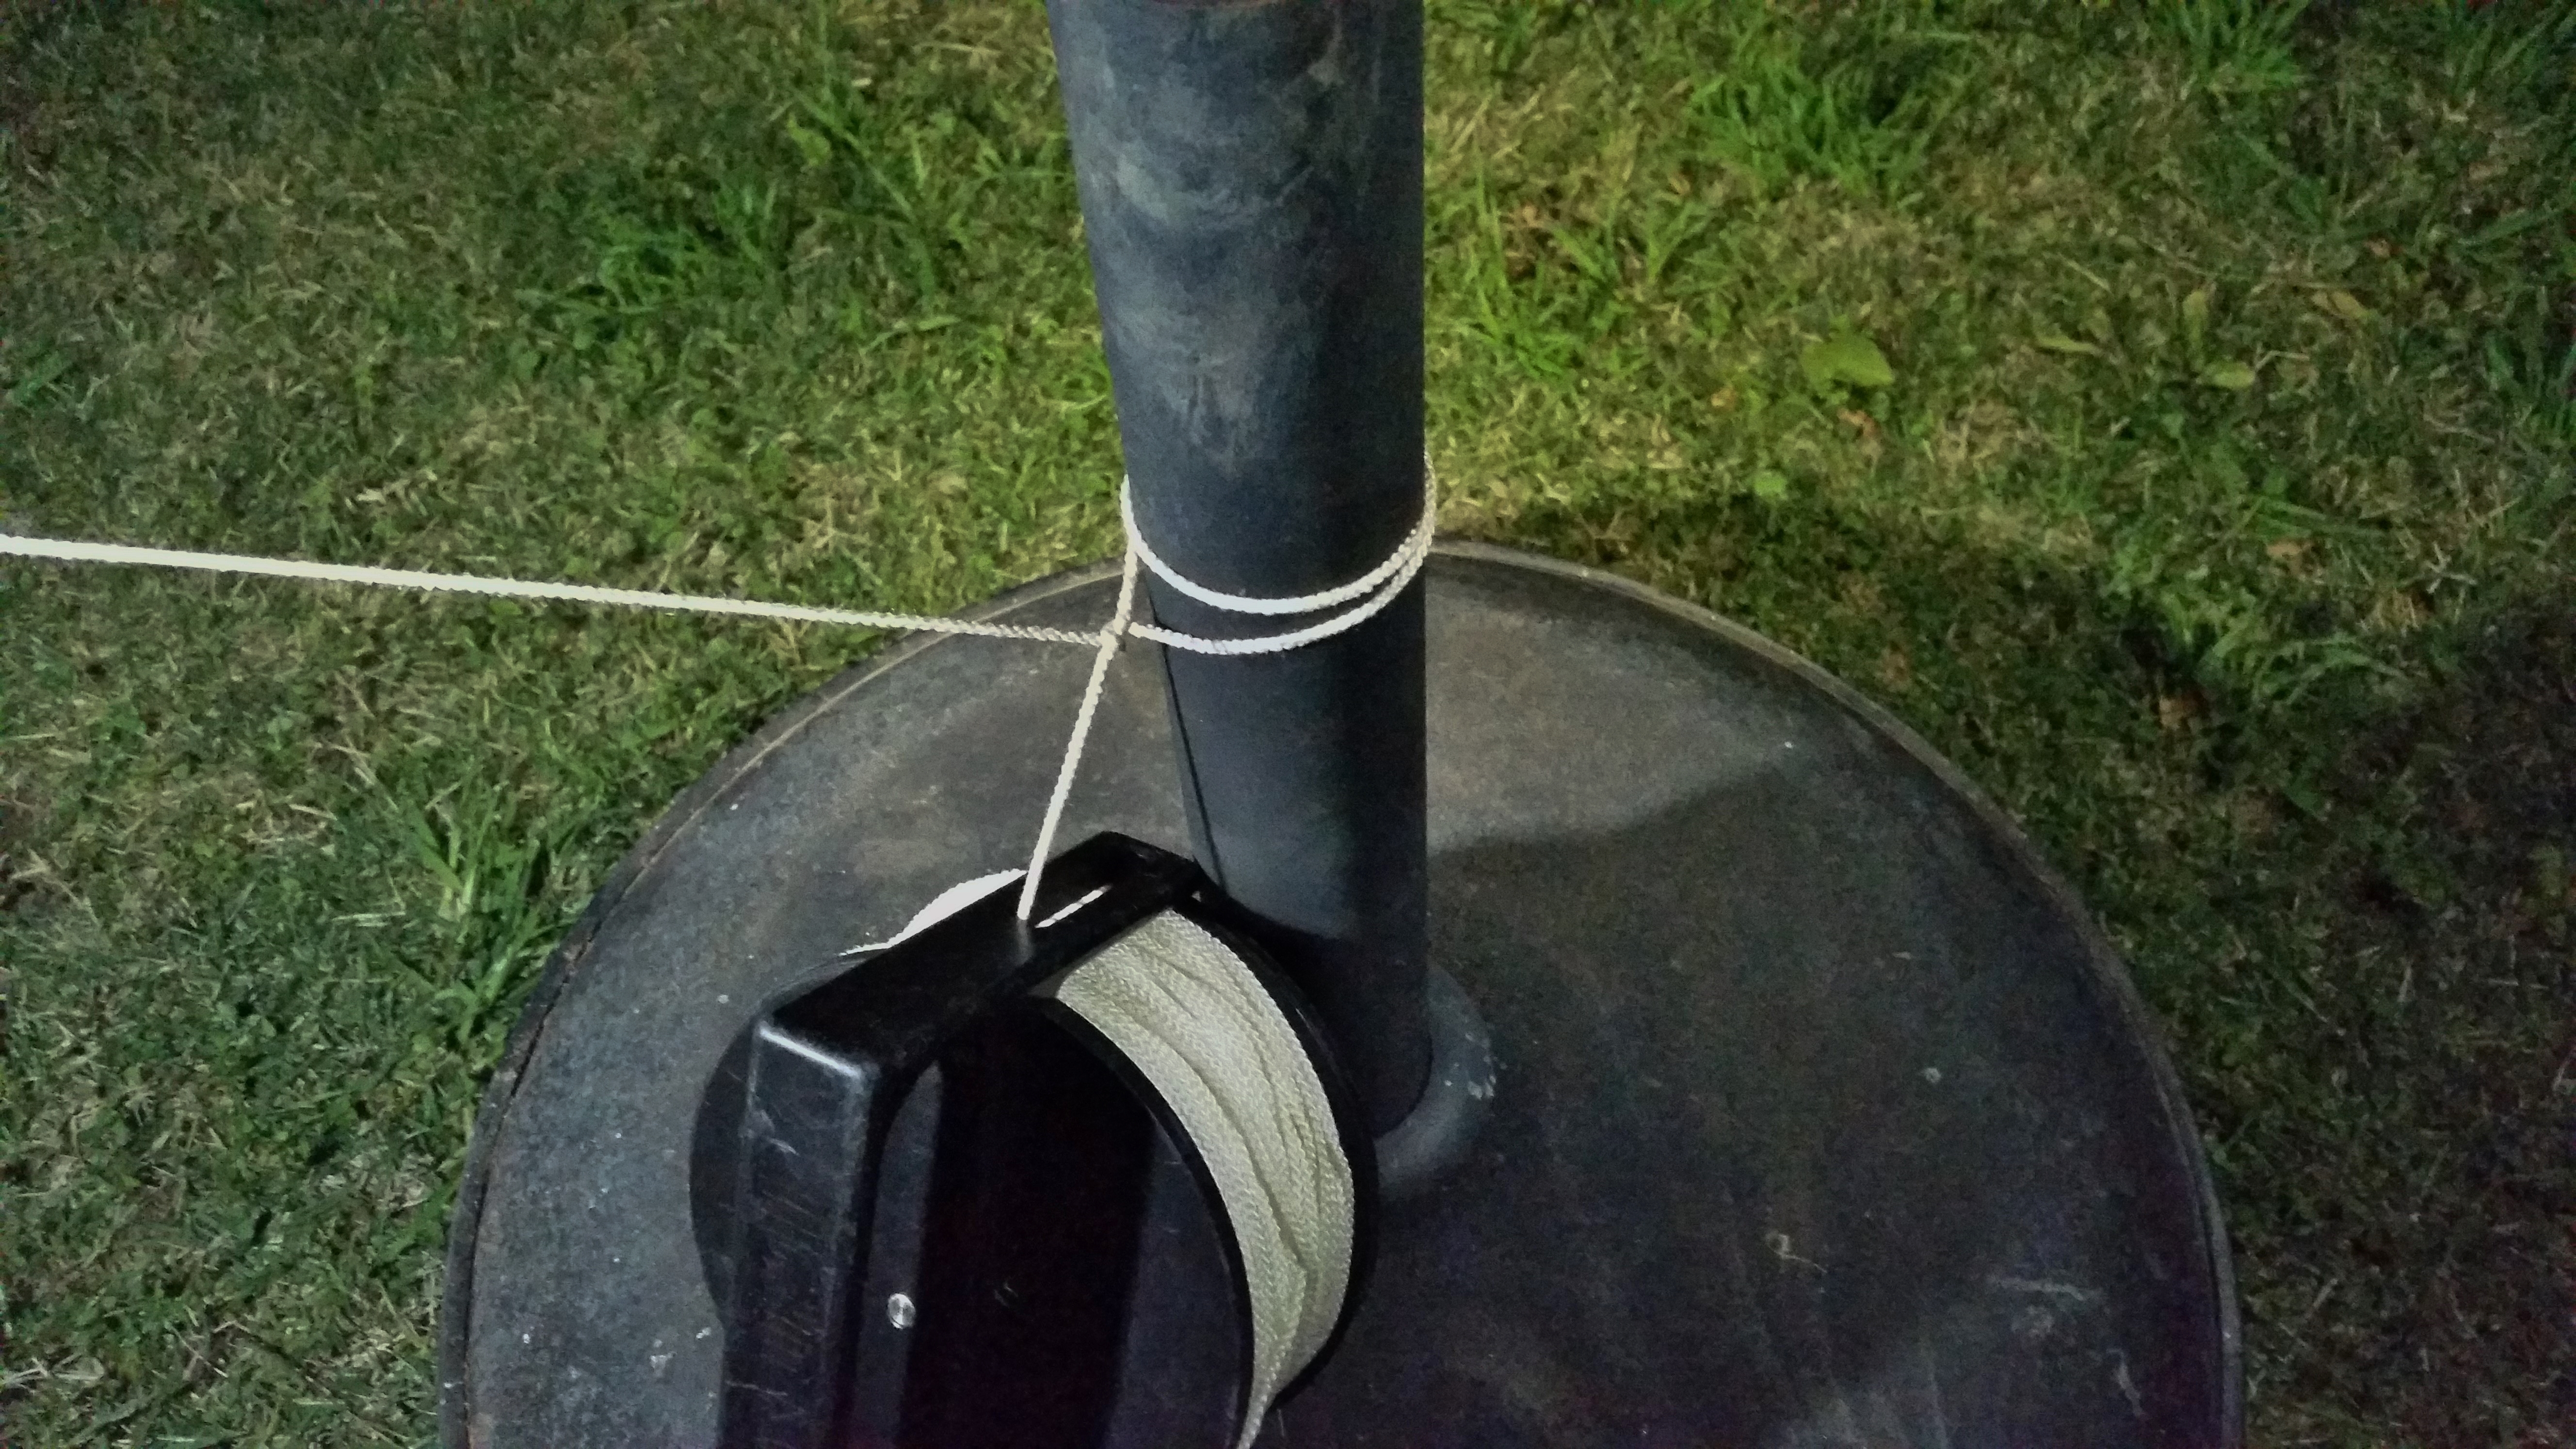
The Secondary Tie Off is equally important and is the next tie off one does. Ideally this is in the vicinity of the entrance to the overhead environment itself or perhaps the first one when reaching the bottom of a sinkhole like formation (daylight should still be clearly visible). This tie off needs to be good enough that if the line between the primary and secondary tie offs was to break or be cut, that the secondary tie off would remain firmly in place. A double single handed wrap works well because it has the tendency not to slip at all, with one wrap working against the other. Doing 2 locking pull around wraps (one on top of the other, ultimately causing the secondary tie off to be locked twice) works equally well. Many other variations work too. Some people like to do a set number of wraps at their secondary tie off to provide a tactile marker. This has more merit if the location coincides with a decompression stop and the area is prone to silting out, that way despite not clearly being able to see the tie off the divers will know they need to stop at this location as a matter of safety. Practicing in the garden is a good way of working out the best and most secure secondary tie off’s and establishing what does and does not work, despite the bemused looks you may get from others!
Retrieving Guideline
Having deployed your guideline you will at some stage get to your turn-around point. You may have got to the end of your line, you may have reached a feature within the wreck or the cave which you and your buddy decided would be your turn around point or more likely either you or your buddy will have signalled that you have got to your agreed safe turn around point of air (or other mixed gas in the event that you are not using air) with a conservative safety margin (at least 2 thirds left each, sometimes more depending on the circumstances).
On turning around the diver(s) following then become the diver(s) leading the way out, while the reeling diver who was previously leading will be at the rear, reeling in the guideline as you all work your way out of the wreck or cave. The person reeling still tries to keep the line reasonably taught as you work your way out. The other divers may assist the reeling diver by removing tie off’s in front of them (this will not be possible for all wraps as with enclosed objects the entire reel may have been threaded through but for protruding objects it may be possible). It’s best to discuss this before the dive as the diver controlling the reel may prefer to remove the tie off’s themself. In the event of bad visibility in particular sometimes this is a better option to ensure the line stays taught (removing a tie off pre-maturely may result in loose line and additional hazards).
Practice, Practice, Practice!
Using a reel and guideline in diving is like learning any other skill, the more you do it, the better you get at it. If you have a particular weakness in any area of diving then it’s important to try and turn that identified weakness into a strength by practicing it enough so it becomes second nature. You may recall when you started diving that there were probably some skills you found more difficult than others, however by repetition of those skills with the correct technique (as opposed to reinforcing poor technique) you probably achieved mastery of them. Make no mistake about it, good reel and guideline use can save your life and that of your buddies in overhead environments. So practice carrying them as standard equipment (even in the ocean as they can be useful there too sometimes to help with navigation or deploying lift bags and surface marker buoys from deeper dive sites). Practice removing them from your BCD/harness, deploying line from them, tying off to various objects with different wraps and tie off’s, practice retrieving the line without letting it get too slack and practice re-attaching it to your BCD/harness. By doing these skills often enough you will find that you are able to quickly master using a reel and guideline whilst diving in overhead environments.
Have a look at this video where I demonstrate several reeling techniques: