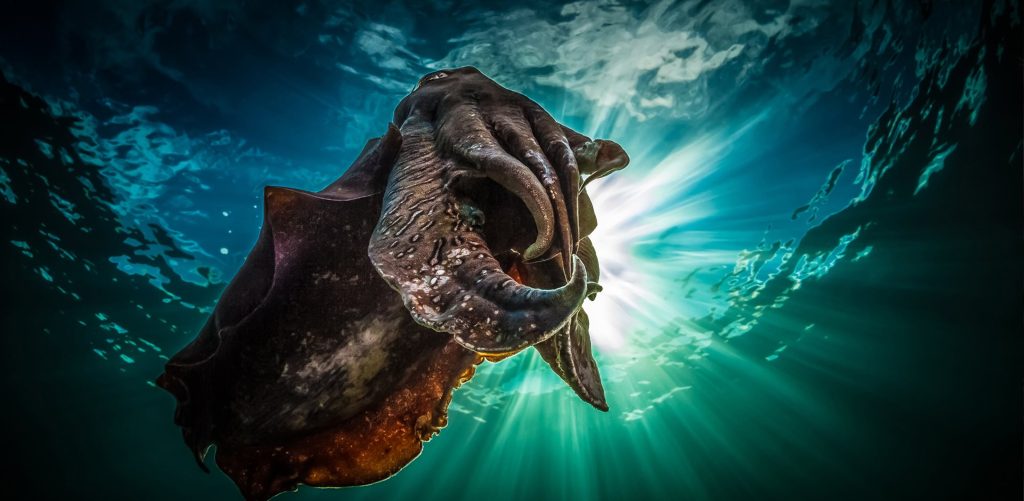
Are you completely captivated by the underwater world, but have not yet taken the plunge and invested in your own scuba gear?
Buying your own set of equipment can seem like a daunting and confusing task. Forums are filled with hundreds of bewildering recommendations, brand names start to blur, and half the descriptions seem to be gibberish. Sound familiar? Fear not – we are here to help!
Purchasing your own equipment is a worthwhile investment, which will open doors to years of unforgettable adventures and experiences. Personal equipment, which is tailored to your diving style and preferences, allows you to explore the underwater world in comfort. Our guide will help you by simplifying the process and breaking it down, step-by-step!
Step 1: Mask & Snorkel
The absolute first step to buying your own set of scuba gear is owning a mask and snorkel. We all know how uncomfortable it can be if you have an ill-fitting mask. Constant water leakage and fogging can be distracting during a dive. Once you find the perfect mask, you will hardly realise you’re wearing it – which means more snorkelling and diving adventures!When choosing a mask there are a few aspects to consider:
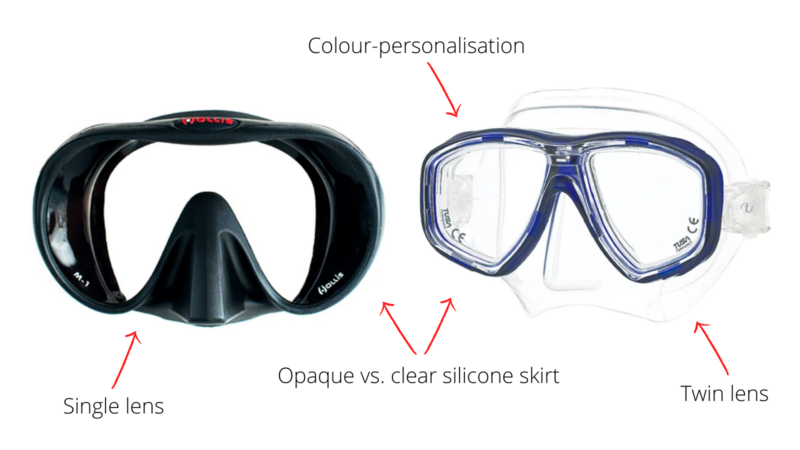
- Skirt is the silicone which moulds to your face, and can either be clear or opaque. There are pros and cons for both, and deciding which is better is purely a personal decision. Clear silicone allows greater light penetration, and seems to broaden peripheral vision. However, once clear masks are older, they often turn a yellow colour and can show mould and grime in the creases. Opaque silicone stops light refracting on the inside of the lens. It gives more of a tunnel-vision effect, and allows you to focus more directly on the critters below.
- Frame type is either twin or single, depending on the shape of the mask. Single lenses broaden your field of vision, and can be more comfortable for people with prominent foreheads and noses. Twin lenses, on the other hand, are typically lower volume and so are easier to clear. Changing to prescription lenses is also an option with certain brands.
- Finally, colour personalisation is often an option for many brands, so you can alter the frame colour to stand out underwater!
But, the most important feature is fit. You want to ensure the natural shape of the silicone works for you. Try this: tilt your head and look at the roof. Next place the mask over your face lightly. Check if there are any gaps between your skin and the skirt. If that works – look straight ahead and suck in gently through your nose. This way you can test the suction and seal of the mask. We recommend trying a range of different types to get a feel for what works for you.
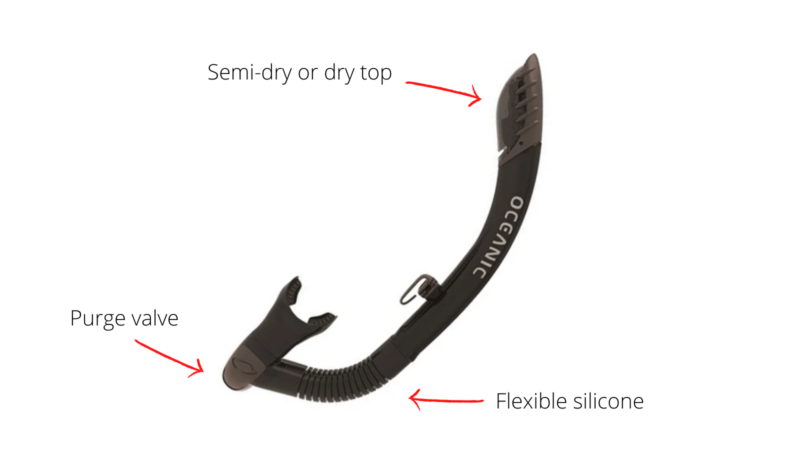
Choosing a snorkel is slightly quicker. Popular features are semi-dry or dry tops, a bottom purge valve, and flexible silicone. These are important so that water doesn’t splash into the tube, less breath is needed to purge the snorkel, and it bends comfortably towards your mouth.
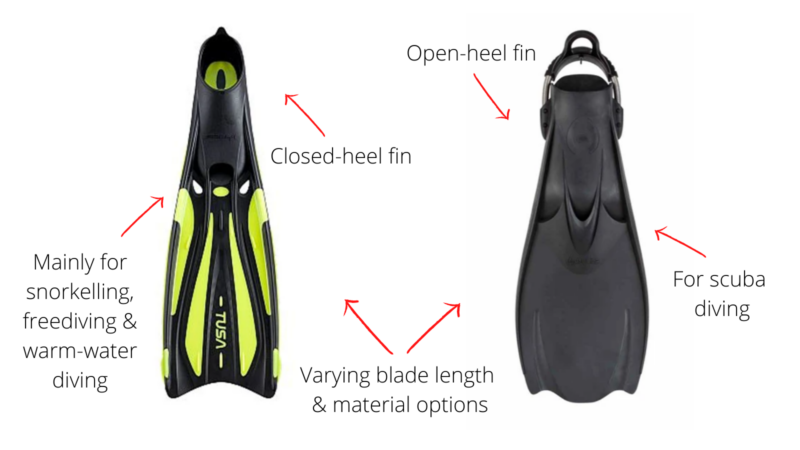
Step 2: Boots & Fins
The second step to building your gear is selecting boots and fins. Having the right fins for your body type, conditions, and dive style can make an enormous difference! They can positively impact your propulsion and finning techniques – making your movement more efficient, and therefore improving air consumption. Things to consider are:
- Pocket type is either a full foot fin (no boots required, typically for snorkelling and freediving), or open-heel fins (boots required). Most scuba divers (especially in places like South Australia) opt for an open-heel fin with boots. These will keep your foot secure and warm, are more robust, and are practical for shore diving.
- Next, you will need to choose the fin style, which is the type and shape of material used for the blade. There are endless variations of fin styles, but the most basic differentiation is soft versus firm. Often, softer fins are floppier and longer, and require less energy to propel you through the water. This can be a good option for minimal current, or if you have leg injuries. Firmer fins are often shorter, and will allow for more precise finning techniques (like back-finning and helicopter turn), as well as a stronger kick. However, keep in mind they can require more energy to move through the water, and are often heavier.
Deciding which fins are best for you depends on a range of factors. Heavy, firm fins might work well for dry-suit diving, but not for thinner wetsuits in warm water. Consider what your requirements might be, and then try a few before making a decision!
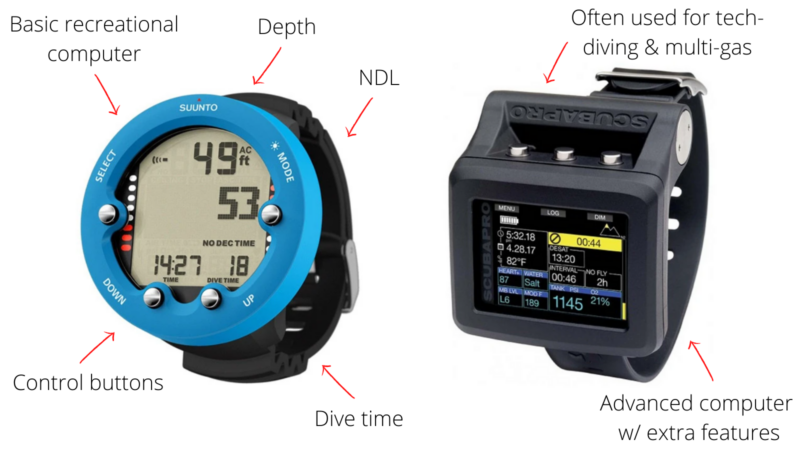
Step 3: Dive Computer & Wetsuit
Selecting a dive computer and wetsuit is the third step to completing your personal equipment. Having your own dive computer is great for safety purposes, and allows you to have greater control over your dive. The range of dive computers available on the market is enormous, and practically every brand offers multiple variations – much of which comes down to style preference and budget.
The basics you want included are: depth, safety stop, no decompression limit, time, ascent rate, surface interval, and (optional) Nitrox mode.
These features are important for planning and executing a dive, as your computer uses a range of alarms to warn you before exceeding any limits. Different computers also implement different algorithms, which are the mathematical calculations used in decompression models. Although most recreational computers have similar NDL’s, if you’re interested in the maths behind the screen – it may be worth doing some extra reading. We recommend playing with some computers to see whether their display feels comfortable and user-friendly. Make sure once you buy your computer to read the manual! It’s important to understand all features.
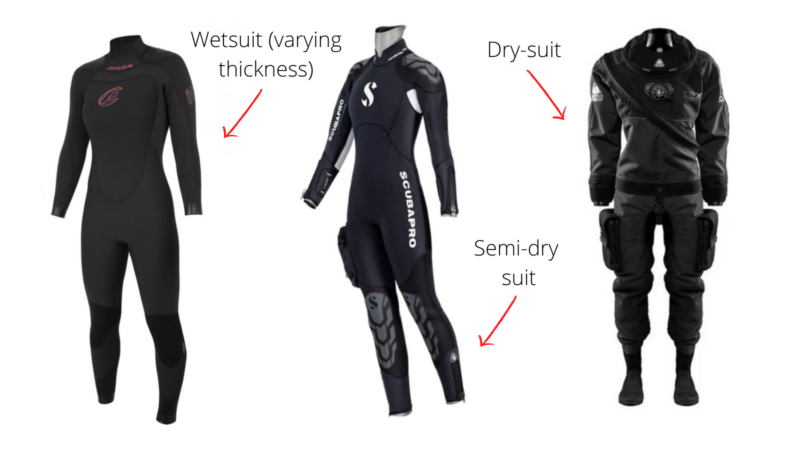
Which exposure suit you choose really depends on the local conditions and your core temperature. You need to consider where you will be doing most of your diving. Long wetsuits are usually either 3mm, 5mm, or 7mm (with potential variations). Any colder, and you may need to consider a semi-dry or dry-suit, which is a whole other discussion. Finding the right fit is a bit of trial and error, as all brands have slightly different cuts. Working your way through a few options will give you a feel for what best fits your body shape and dive conditions.
Step 4: BCD & Regulator
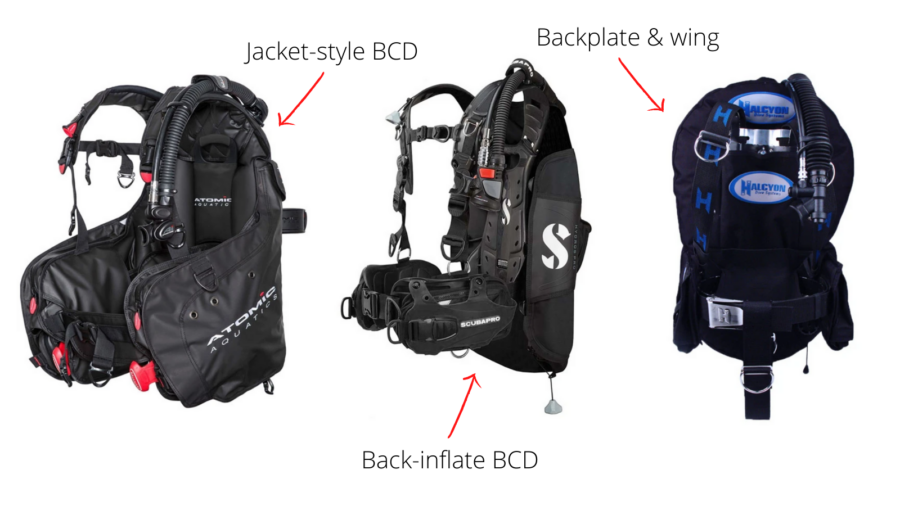
The final step in completing your full set of equipment is deciding on a BCD and regulator. This can be a little more complicated, as there are so many options to choose from, and you want to ensure you make the right decision for your style of diving. Let’s check it out…BCDs can be divided into three different categories:
- Jacket-style BCDs are the most common, so you probably used one during your Open Water course. The inflation bladder covers a greater area, and encompasses your waist, as well as your back. They often have sizeable pockets for storage, and integrated weights. Although this is very practical, it does result in a bulkier BCD, which reduces streamlining and adds overall weight. Additionally, extra material also means many models take some time to dry after a dive – which can be tricky when travelling.
- Back-inflate BCDs are a mid-point between traditional jacket-style and a backplate & wing. The bladder exclusively mounts to your back, which is beneficial for maintaining trim underwater. However, when fully-inflated on the surface, it can sometimes be difficult to stay vertical – so lean back into the BCD. These are often more streamlined, as there is less clutter surrounding your torso. Depending on the model, they may have pockets and/or integrated weights, so consider what features you will require. Generally, they are more lightweight and so are practical for travelling, but this doesn’t apply to all models.
- Finally, backplate & wings come from a technical diving background – however this simplistic design is becoming increasingly popular among recreational divers too. As the name suggests, they’re made up of a backplate (varying materials), a donut-shaped bladder (wing), and a harness. They’re customisable – meaning you can swap the wing shape or backplate for a new set-up. Nonetheless, there are some downfalls. Adjusting the harness can be time-consuming, and is a matter of trial and error. You’ll also need to add pockets for storage or make use of your numerous D-rings.
One aspect to keep in mind with BCDs is how much lift you will require. All models and sizes have different maximum lift capacity ratings. Of course, tropical diving will require less lift than colder water, dry-suit, or tech diving – so consider what works best for you!
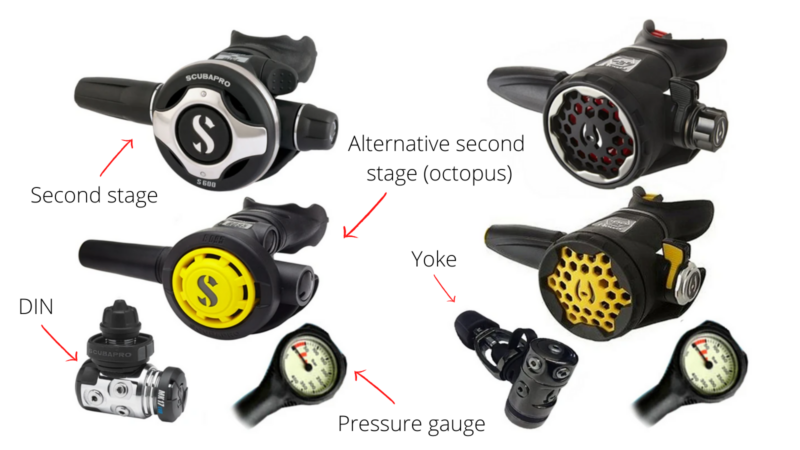
Regulators convert the high-pressure air from your tank to ambient pressure to breathe. Generally, regulator sets are made up of a first stage (which connects to your tank valve), two second stages (your primary and secondary air source), an LPI hose (which connects to your BCD), and a pressure gauge.
When purchasing, there are three main things to consider – dive conditions (temperature, type of diving), tank connection, and budget:
- Dive conditions: If you’re diving in warm waters, a lightweight/travel first stage will be fine. In colder waters, you may opt for a sturdier one. Environmental seal may also be a good option – as in near-freezing water it ensures ice doesn’t form in the first stage (which leads to free-flow). Nonetheless, an environmental seal is beneficial for other reasons too – as they prevent internal corrosion and salt or grime entering the first stage. If you are interested in tech diving, especially alternative set-ups like sidemount or twinset, you may need other features, such as extra ports and swivel.
- Tank connection comes either as DIN or Yoke – both of which are fine. DIN screws into the tank, and can easily be converted to Yoke with an adapter. Yoke clamps to the outside of the valve, however converting to DIN is tricky. The choice is yours! It’s best to check what the majority of local divers use, and what you feel most comfortable with.
- Finally, your personal budget will play a big role. There are countless options and variations of regulators, with an enormous range in price. The majority of price variation is based on which materials are used. Metal second stages, for example, are more costly than plastic ones. However, they are more durable, and condensate to moisten the air – meaning your throat and chest won’t feel as dry. Remember that a good set of regulators can last you an extremely long time if you take care of them, so consider this in your decision making.
Make sure when you’re purchasing a regulator to have a chat to your fellow dive buddies and your local store! Explain your dive requirements and conditions, and they will be able to help you find the best product to suit your requirements and budget. Remember – this piece of equipment keeps you breathing underwater…so, safety is the #1 priority! Go to a reputable store, and get your regulator serviced regularly.
If you’re passionate about exploring the underwater world, investing in your own equipment is a must. There are countless adventures to be had, both near and far – so grab your fins and dive in!